이제 uart를 통해 터미널에서 N 100개 찍히는걸 확인했으니
이제 pritntf 함수를 구현해 hello world 출력을 구현한다.
printf는 stdio.h에 가져와서 쓰고 일단 putstr부터 만들면
lib/stdio.h
#ifndef LIB_STDIO_H_
#define LIB_STDIO_H_

uint32_t putstr(const char* s);

#endif
lib/stdio.c
#include <stdint.h>
#include "HalUart.h"
#include "stdio.h"

uint32_t putstr(const char* s)
{
	uint32_t c =0;
	while(*s)
	{
		Hal_uart_put_char(*s++);
		c++;
	}
	return c;
}
make file에다가도 추가된 lib 폴더와 stdio.c/.h 파일추가해준뒤
ARCH=armv7-a
MCPU=cortex-a8

TARGET=rvpb

CC=arm-none-eabi-gcc
AS=arm-none-eabi-as
LD=arm-none-eabi-ld
OC=arm-none-eabi-objcopy

LINKER_SCRIPT=./navilos.ld
MAP_FILE=build/navilos.map

ASM_SRCS=$(wildcard boot/*.S)
ASM_OBJS=$(patsubst boot/%.S, build/%.os, $(ASM_SRCS))

VPATH = boot			\
		hal/$(TARGET)	\
		lib

C_SRCS	=	$(notdir $(wildcard boot/*.c))
C_SRCS	+=	$(notdir $(wildcard hal/$(TARGET)/*.c))
C_SRCS	+=	$(notdir $(wildcard lib/*.c))
C_OBJS	=	$(patsubst %.c, build/%.o, $(C_SRCS))

INC_DIRS	=	-I include			\
				-I hal				\
				-I hal/$(TARGET)	\
				-I lib

CFLAGS = -c -g -std=c11

navilos=build/navilos.axf
navilos_bin=build/navilos.bin

.PHONY: all clean run debug gdb

all:$(navilos)

clean:
	@rm -fr build

run: $(navilos)
	qemu-system-arm -M realview-pb-a8 -kernel $(navilos) -nographic

debug: $(navilos)
	qemu-system-arm -M realview-pb-a8 -kernel $(navilos) -S -gdb tcp::1234,ipv4

gdb:
	gdb-multiarch

$(navilos):$(ASM_OBJS) $(C_OBJS) $(LINKER_SCRIPT)
	$(LD) -n -T $(LINKER_SCRIPT) -o $(navilos) $(ASM_OBJS) $(C_OBJS) -Map=$(MAP_FILE)
	$(OC) -O binary $(navilos) $(navilos_bin)

build/%.os: %.S
	mkdir -p $(shell dirname $@)
	$(CC) -mcpu=$(MCPU) $(INC_DIRS) $(CFLAGS) -o $@ $<

build/%.o: %.c
	mkdir -p $(shell dirname $@)
	$(CC) -mcpu=$(MCPU) $(INC_DIRS) $(CFLAGS) -o $@ $<
boot/Main.c도 수정
#include <stdint.h>

#include "HalUart.h"
#include "stdio.h"

static void Hw_init(void);

void main(void)
{
	Hw_init();

	uint32_t i = 100;
	while(i--)
	{
		Hal_uart_put_char('N');
	}
	Hal_uart_put_char('\n');
	putstr("Hello World!\n");
}

static void Hw_init(void)
{
	Hal_uart_init();
}
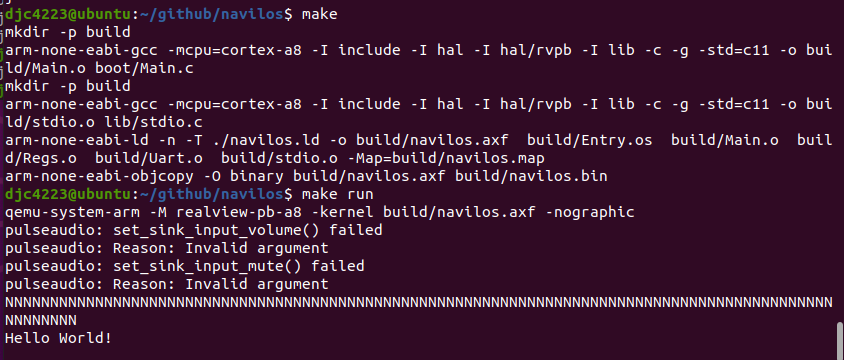
빌드하면 메인 함수에 작성한대로
Hello world가 잘 출력되었다.
이번에는 getchar를 구현할 차례인대
송신 버퍼가 비워진지 확인하고, 데이터 레지스터에 값을 넣는 식으로 송신했듯이
이번에는 수신 버퍼가 채워진지 체크하고,
체워지면 데이터레지스터에서 값을 받아오면 되는 식이다.
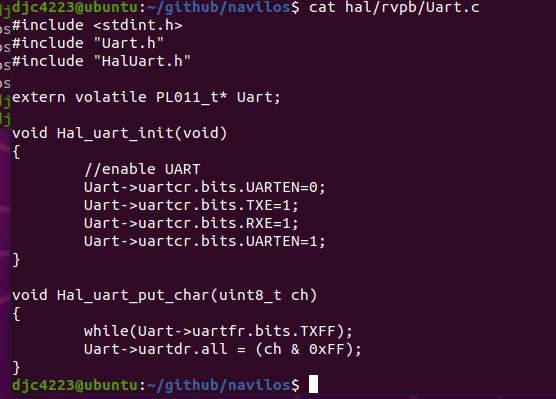
hal/rvpb/Uart.c와
hal/HalUart.h에 get char 관련 함수를 추가해주자.
수신 버퍼가 채워지면, 에러있는경우 클리어해주고 아니면 데이터를 받아와 반환해주는 내용이다.
uint8_t Hal_uart_get_char(void)
{
	uint8_t data;

	while(Uart->uartfr.bits.RXFE);

	//check for and error flag
	if (Uart->uartdr.all & 0xFFFFFF00)
	{
		//clear the error
		Uart->uartrsr.all = 0xFF;
		return 0;
	}

	data = Uart->uartdr.bits.DATA;
	return data;
}
hal/HalUart.h
#ifndef HAL_HALUART_H_
#define HAL_HALUART_H_

void Hal_uart_init(void);
void Hal_uart_put_char(uint8_t ch);
uint8_t Hal_uart_get_char(void);

#endif /* HAL_HAALUART_H_ */
main.c도 입력받은 뒤 에코하도록 수정해서 보면
#include <stdint.h>

#include "HalUart.h"
#include "stdio.h"

static void Hw_init(void);

void main(void)
{
	Hw_init();

	uint32_t i = 100;
	while(i--)
	{
		Hal_uart_put_char('N');
	}
	Hal_uart_put_char('\n');
	putstr("Hello World!\n");

	i = 100;
	while(i--)
	{
		uint8_t ch = Hal_uart_get_char();
		Hal_uart_put_char(ch);
	}
}

static void Hw_init(void)
{
	Hal_uart_init();
}
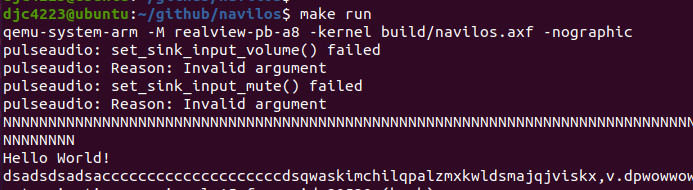
빌드하고 돌린뒤 키보드 입력을 주면 딜레이가 좀 있긴하지만 동작하긴한다.
'컴퓨터과학 > os' 카테고리의 다른 글
| 나빌로스 하다가 찾은 문제 (0) | 2022.08.20 |
|---|---|
| navilos - 9. UART 3 printf 구현하기 (0) | 2022.08.20 |
| navilos - 7. UART 1 (0) | 2022.08.18 |
| navilos - 6. 익셉션 핸들러 구현2, 메인함수 진입 (0) | 2022.08.18 |
| navilos - 5. 익셉션 핸들러 구현 1 (0) | 2022.08.17 |