2차원 공간 발사체의 최적 발사 각도 구하기
(1) 발사체 궤적 플로팅
발사체의 최대거리 함수 r(theta)가 있을시, 거리를 최대로 하는 theta를 찾는 문제를 다룬다고 하자
일단 발사체 궤적과 플로팅 함수는 다음과 같다
vx, vz는 속도를 xy축으로 분해한 성분으로
궤적 루프는 z가 0이 될때 즉 발사체가 땅으로 떨어지면 종료한다.
import matplotlib.pyplot as plt
from matplotlib import cm
import numpy as np
from math import sin, cos, pi

def trajectory(theta, speed=20, height=0, dt=0.01, g=-9.81):
    vx = speed * cos(pi * theta / 180)
    vz = speed * sin(pi * theta / 180)
    t, x, z = 0, 0, height
    ts, xs, zs = [t], [x], [z]
    while z >= 0:
        t += dt
        vz += g * dt
        x += vx * dt
        z += vz * dt
        ts.append(t)
        xs.append(x)
        zs.append(z)
    return ts, xs, zs

def plot_trajectories(*trajs, show_seconds=False):
    for traj in trajs:
        xs, zs = traj[1], traj[2]
        plt.plot(xs, zs)
        if show_seconds:
            second_indices = []
            second = 0
            for i, t in enumerate(traj[0]):
                if t >= second:
                    second_indices.append(i)
                    second +=1
            plt.scatter([xs[i] for i in second_indices], [zs[i] for i in second_indices])
    xl = plt.xlim()
    plt.plot(plt.xlim(), [0, 0], c='k')
    plt.xlim(*xl)

    width = 7
    coords_height = (plt.ylim()[1] - plt.ylim()[0])
    coords_width = (plt.xlim()[1] - plt.xlim()[0])
    plt.gcf().set_size_inches(width, width * coords_height / coords_width)
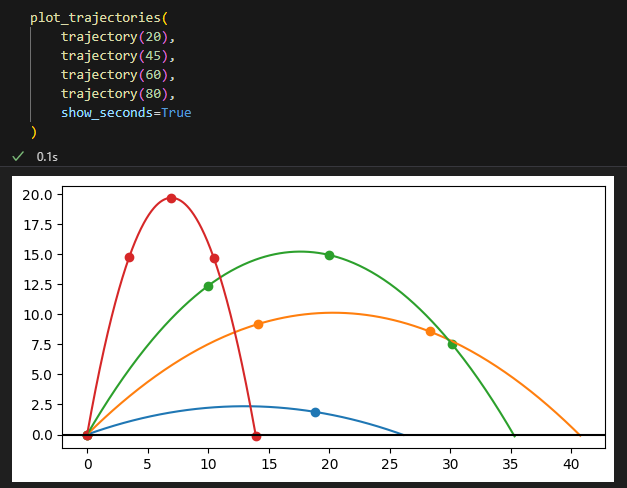
일단 발사각 45, 60인 경우 발사 궤적은 이런식인데
45도일때 가장 멀리 나간다.

plot_trajectories(
    trajectory(45),
    trajectory(60)
)
(2) 발사체 궤적 성질보기
최대 발사각 구하려면 지금 처럼 모든 각도에 대한 궤적을 플로팅해서 가장 멀리가는걸 찾거나
r(theta)를 최대로 하는 theta를 최적화 기법을 찾아내야한다.
일단 궤적 성질이라하면 도착거리, 최대 높이, 체공 시간 정도가 있는데
궤적 함수로부터 다음과같이 뽑아낼 수 있음
def landong_position(traj):
    return traj[1][-1]

def hang_time(traj):
    return traj[0][-1]

def max_height(traj):
    return max(traj[2])

traj_45 = trajectory(theta=45)

print(landong_position(traj_45))
print(hang_time(traj_45))
print(max_height(traj_45))
(3) 여러 각도에서 도착 거리 보기
위에서 도착거리, 체공시간, 최대 높이에 대한 함수를 구현했다.
r(theta)는 발사체의 도착 거리이므로
여러 각도 값을 주어 산점도로 플로팅해보자
아까 구현한 궤적 함수의 경우 시간에 따른 도착 거리지만
지금 플로팅한것은 발사각 세타에 대한 높이를 나타낸다.
대충 봐도 45도쯤에서 발사 거리가 최대로 나온다.
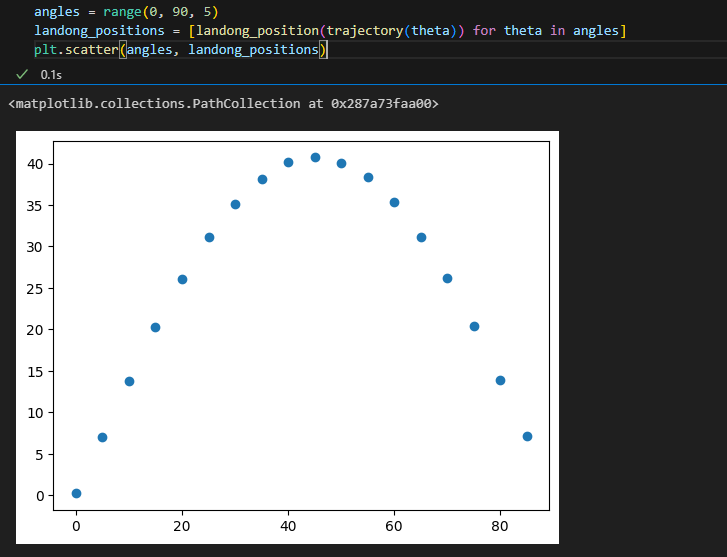
angles = range(0, 90, 5)
landong_positions = [landong_position(trajectory(theta)) for theta in angles]
plt.scatter(angles, landong_positions)
(4) 여러 발사 각도에서 채공시간 보기
1초간 발사체 위치는 아까 플로팅 궤적 함수에서 옵션이 있어 true를 주면 이런식으로 나온다.
아깐 theta별 거리에 대한 함수를 만들어서 플로팅했다면
이번에는 theta별 채공 시간에 대해 만들어서 플로팅해보자
45도 즘에서 최대 거리가 됫던것과는 다르게
90도쯤에서 가장 채공시간이 높게 나온다.
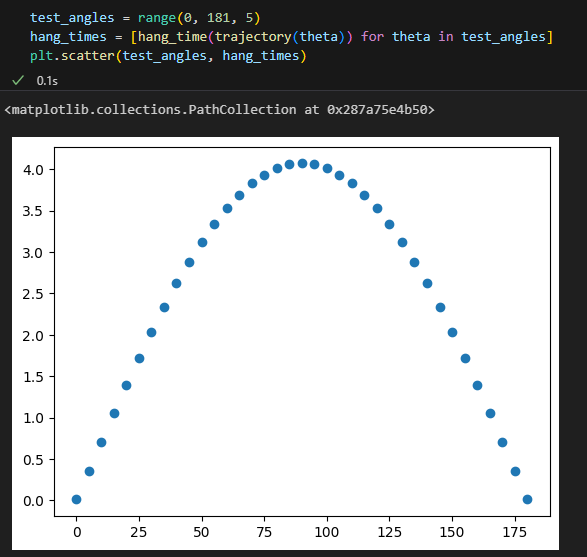
test_angles = range(0, 181, 5)
hang_times = [hang_time(trajectory(theta)) for theta in test_angles]
plt.scatter(test_angles, hang_times)
(5) 지표와 각도가 주어질때 산점도 플로팅 함수
아까 발사체 지표가 도착거리, 채공시간, 최대 높이 3가지가 있었는데
방금 구현한것처럼 지표를 주면 바로 산점도 띄우는 함수를 만들자
이런식으로 채공 시간을 플로팅했고,
최대 높이나 거리도 플로팅 가능

def plot_trajectories(metric, thetas, **settings):
    plt.scatter(thetas, [metric(trajectory(theta, **settings)) for theta in thetas])

plot_trajectories(hang_time, range(0, 181, 5))
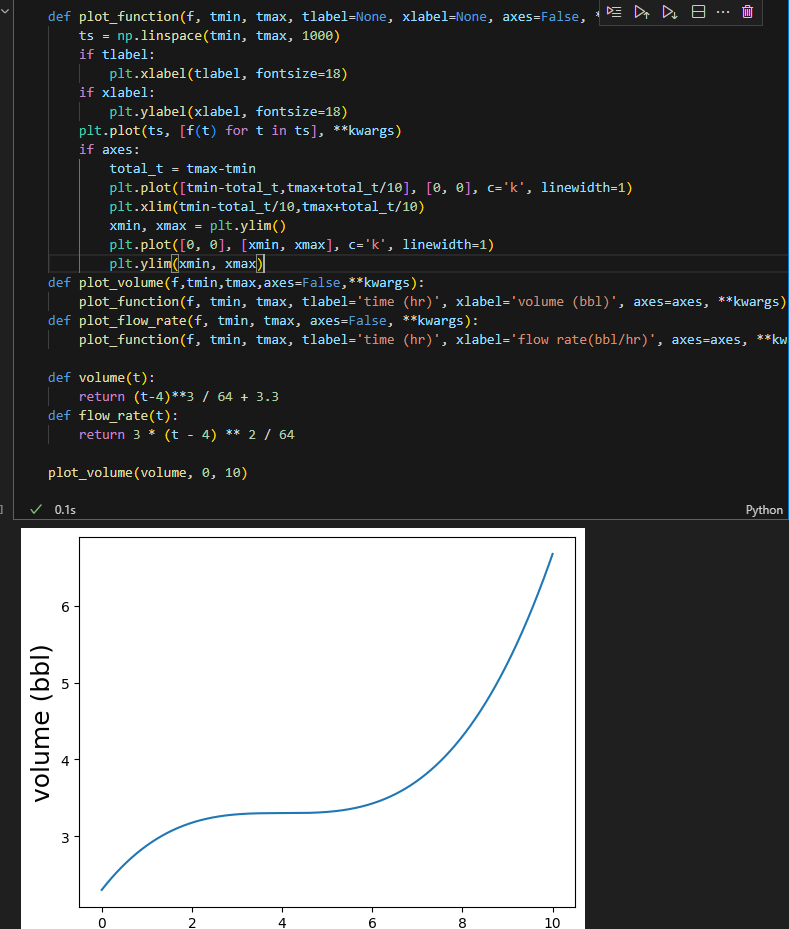
최대 거리의 경우 발사 시작점 높이가 10인 가정시 다음과 같음

plot_trajectories(landong_position, range(0,90, 5), height=10)
(6) 함수로 최적 거리구하기
위에서 한내용은 대충 오일러 방법으로 구하고, 그래프 플로팅해서 눈대중으로 찾아보았다.
이번에는 함수로 구해봄
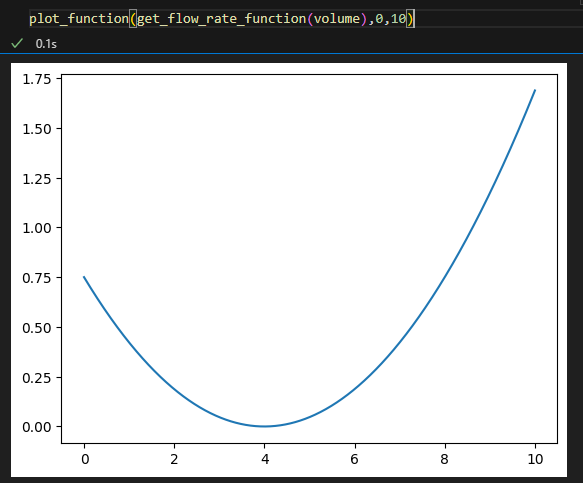
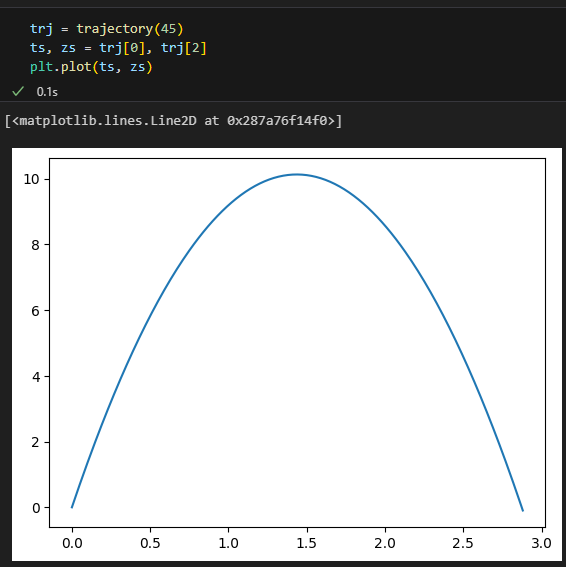
일단 45도때 궤적을 플롯해보자
지금까지 계속 보던 포물선 그래프가 나온다.
발사 거리는 z(t) = 0인 시점이 되는 t로 정해짐
z 방향 속도 z'(t) = 초기 속도 + 중력 속도(가속도 아님)로 정해지고 이를 적분하면
z 방향 거리 z(t)가 아래와 같이 나온다.
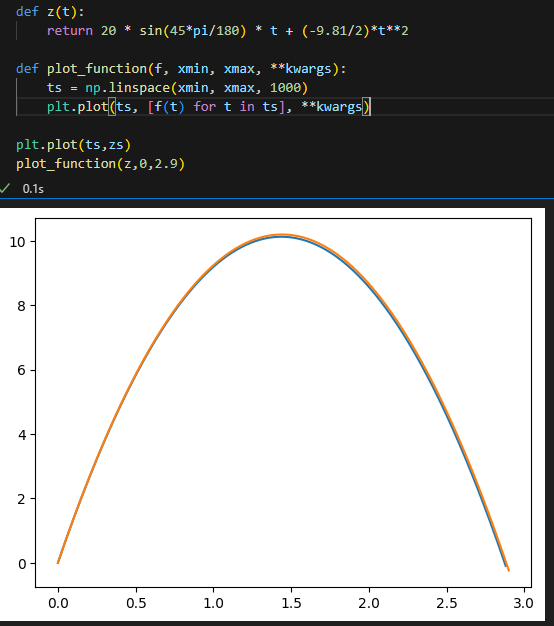
z(t)가 t에 대한 이차식이 되었으므로 근의 공식으로 해를 구할수 있음
t = -2vz/g를
발사거리 r = vx * dt = |v| cos(theta) dt에 대입하여
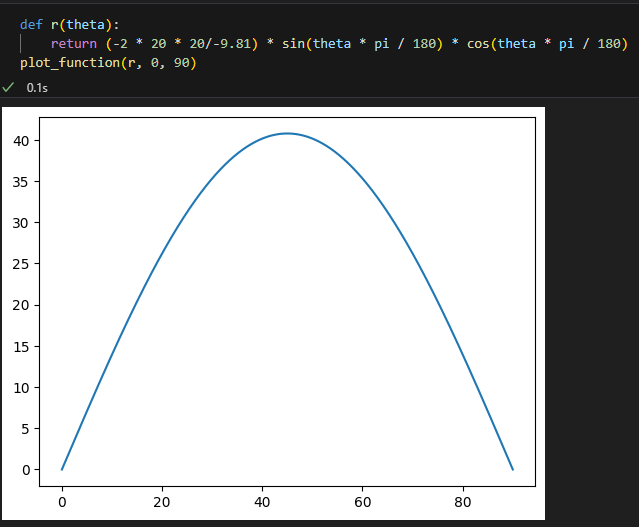
각도별 거리
r(theta) = - 2|v|**2/g * sin(theta) * cos(theta)로 정리가 가능
다시 정리하자
1. z축 거리가 0이 되는 시간 t를 구함, z(t) = 0이되는 t를 구함
2. x축 거리 함수에 대입하여 theta별 거리 r(t)를 구함
이를 플로팅하면 아까 궤적 함수를 플로팅했을때랑 동일한 형태 결과가 나온다.
최대 거리를 구하려면? r(theta) = 발사 거리 함수가 주어졌을때
r'(theta) = 0, 극점이 되는 theta를 구하면 된다.
trj = trajectory(45)
ts, zs = trj[0], trj[2]
plt.plot(ts, zs)


def z(t):
    return 20 * sin(45*pi/180) * t + (-9.81/2)*t**2

def plot_function(f, xmin, xmax, **kwargs):
    ts = np.linspace(xmin, xmax, 1000)
    plt.plot(ts, [f(t) for t in ts], **kwargs)

plt.plot(ts,zs)
plot_function(z,0,2.9)


def r(theta):
    return (-2 * 20 * 20/-9.81) * sin(theta * pi / 180) * cos(theta * pi / 180)
plot_function(r, 0, 90)
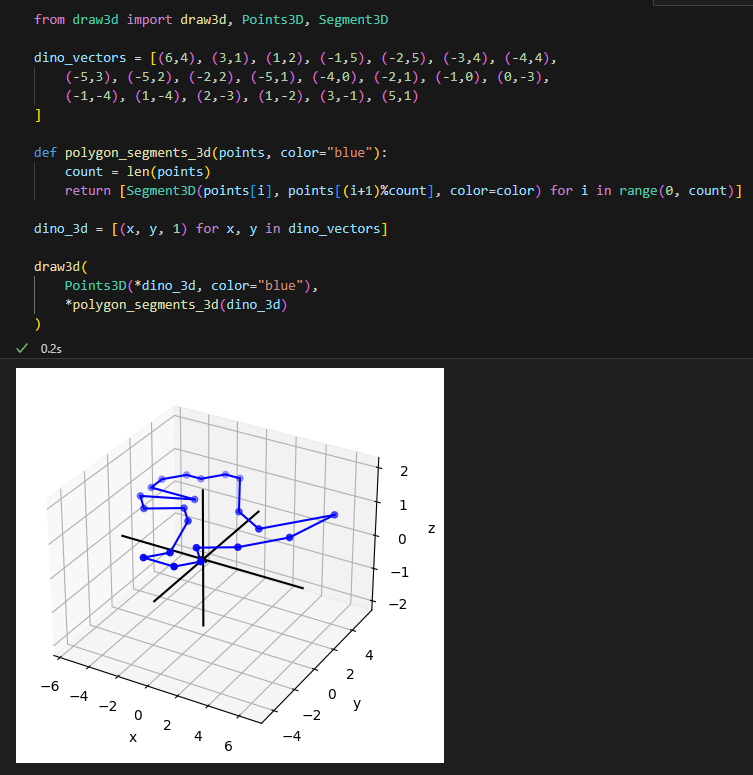
3치원 궤적 다루기
(1) 3차원 궤적 플로팅
위에서 한 경우는 발사각 theta가 주어졌을때 xz축에서의 거리와 높이를 다루었음
이번엔 y축 phi를 추가하여 xyz 3d 공간에서의 궤적을 다룸
r(t) = 거리 했던거랑은 달리
이런 식으로 표현하면 되나 싶음
r(t, theta, phi) = (x, y, z)
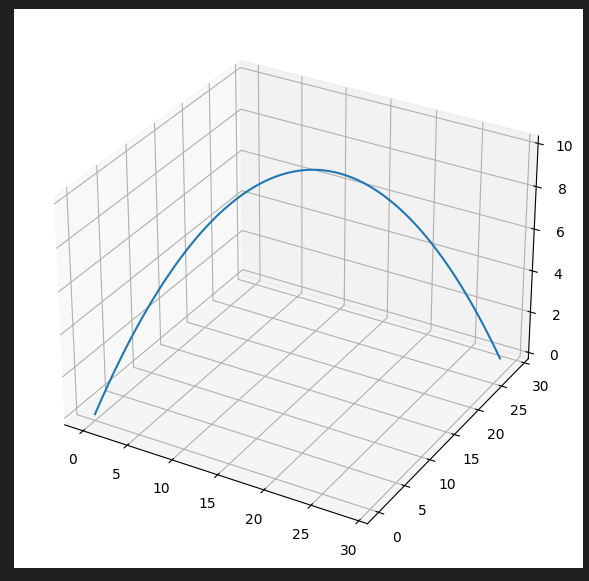
def trajectory3d(theta, phi, speed= 20, height=0, dt=0.01, g=-9.81):
vx = speed * cos(pi * theta / 180) * cos(pi * phi / 180)
vy = speed * cos(pi * theta / 180) * sin(pi * phi / 180)
vz = speed * sin(pi * theta / 180)
t, x, y, z = 0, 0, 0, height
ts, xs, ys, zs = [t], [x], [y], [z]
while z >= 0:
t += dt
vz += g * dt
x += vx * dt
y += vy * dt
z += vz * dt
ts.append(t)
xs.append(x)
ys.append(y)
zs.append(z)
return ts, xs, ys, zs
def plot_trajectory3d(traj):
fig = plt.gcf()
fig.set_size_inches(7, 7)
ax = fig.gca(projection='3d')
ax.plot(traj[1], traj[2], traj[3])
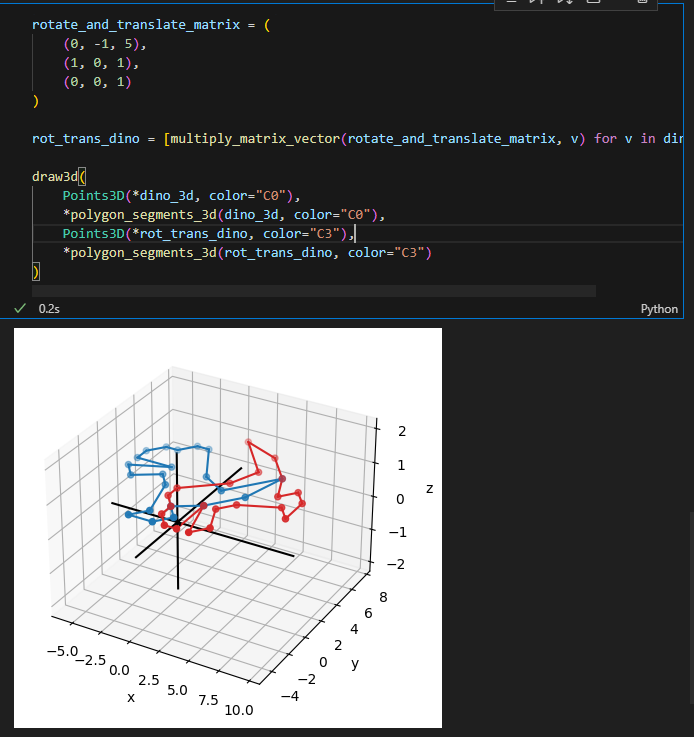
plot_trajectory3d(trajectory3d(45, 45))
(2) 지형을 추가한 3차원 궤적 플로팅
위 3차원 궤적 플로팅에서는 지형이 존재하지 않음
3d 궤적함수와 플롯팅 함수에 지형 요소를 추가
지형 함수로는 릿지 함수 사용
(x^2 - 5 y ^2)/2500
궤적 계산시 z >= 지형(x, y)인 경우에만 루프하여 궤적 추적
3차원 플로팅시 지형 서피스도 띄움
traj(20, 0)
traj(20, 270)인 두 경우에 대한 3차원 궤적
def flat_ground(x, y):
    return 0

def ridge(x, y):
    return (x ** 2 - 5 * y **2) / 2500

def trajectory3d(theta, phi, speed=20, height=0, dt=0.01, g=-9.81, elevation=flat_ground):
    vx = speed * cos(pi * theta / 180) * cos(pi * phi / 180)
    vy = speed * cos(pi * theta / 180) * sin(pi * phi / 180)
    vz = speed * sin(pi * theta / 180)
    t, x, y, z = 0, 0, 0, height
    ts, xs, ys, zs = [t], [x], [y], [z]
    while z >= elevation(x, y):
        t += dt
        vz += g * dt
        x += vx * dt
        y += vy * dt
        z += vz * dt
        ts.append(t)
        xs.append(x)
        ys.append(y)
        zs.append(z)
    return ts, xs, ys, zs

def plot_trajectories_3d(*trajs, elevation=flat_ground, bounds=None, zbounds=None, shadows=False):
    fig, ax = plt.gcf(), plt.gca(projection='3d')
    fig.set_size_inches(7, 7)
    if not bounds:
        xmin = min([x for traj in trajs for x in traj[1]])
        xmax = max([x for traj in trajs for x in traj[1]])
        ymin = min([x for traj in trajs for x in traj[2]])
        ymax = max([x for traj in trajs for x in traj[2]])

        padding_x = 0.1 * (xmax-xmin)
        padding_y = 0.1 * (ymax-ymin)
        xmin -= padding_x
        xmax += padding_x
        ymin -= padding_y
        ymax += padding_y
    else:
        xmin, xmax, ymin, ymax = bounds
    plt.plot([xmin, xmax], [0, 0], [0, 0], c='k')
    plt.plot([0, 0], [ymin, ymax], [0, 0], c='k')
    g = np.vectorize(elevation)
    ground_x = np.linspace(xmin, xmax, 20)
    ground_y = np.linspace(ymin, ymax, 20)
    ground_x, ground_y = np.meshgrid(ground_x, ground_y)
    ground_z = g(ground_x, ground_y)
    ax.plot_surface(ground_x, ground_y, ground_z, cmap=cm.coolwarm,
                    alpha=0.5,linewidth=0, antialiased=True)

    for traj in trajs:
        ax.plot(traj[1], traj[2], traj[3])

    if zbounds:
        ax.set_zlim(*zbounds)

plot_trajectories_3d(
    trajectory3d(20, 0, elevation=ridge),
    trajectory3d(20, 270, elevation=ridge),
    bounds=[0,40,-40,0],
    elevation=ridge
)
(3) 3차원 공간에서 발사체 궤적 거리 구하기
2d 차원에서 theta를 x축에 놓고 거리를 y축에 놓아 그래프로 표현했었음
이번에는 3d에서 다룸
고도 함수 h(x, y) = (x^2 - 5y^2) / 2500이므로
h(x, y) = Bx^2 - Cy^2로 놓으면
B = 1/2500
C= 5/2500이 된다.
발사체의 고도는 시간 t에 따라 변하므로 h(t)라 일단 하고
x, y는 vx * t, vy * t로 구할수 있다.
h(x, y)에 이를 대입하면
h(vx * t, vy * t) = B vx^2 t^2 - C vy^2 t^2 가 된다.
vx, vy는 나두고 t에 대한 이차방정식으로 정리후 근의 공식으로 t에 대한 해를 구하면
t = -vz / (g/s - B vx^2 + cvy^2)가 온다.
다시 정리해보자
지금까지 릿지 경사에서 채공시간을 구하는 과정을 다루었다.
1. 고도 함수 h(x, y)가 있다
2. 발사체 x, y는 vx * t, vy * t로 구한다.
3. 발사체 xy 좌표를 고도함수에 대입한다.
4. x, y에 대한 고도함수를 t에 대한 이차식으로 정리한다.
5. h(vx * t, vy * t) = 0가 되는 t를 근의 공식으로 구한다. <- 채공시간
채공 시간을 구하였으면 xy 평면에서의 이동 거리를 구하면 된다.
vxy * 채공시간을 하면 되는데
vxy = 피타고라스정리 vx, vy로 구하면 됨
2차원에서는 theta 한 변수만 하면됬지만
지금은 theta와 phi 두 변수를 다루므로 따로 플로팅 x
from math import sqrt
B = 0.001
C = 0.005
v = 20
g = -9.81

def velocity_component(v, theta, phi):
    vx = v * cos(theta * pi / 180) * cos(phi * pi / 180)
    vy = v * cos(theta * pi / 180) * sin(phi * pi / 180)
    vz = v * sin(theta * pi / 180)
    return vx, vy, vz

def landing_distance(theta, phi):
    vx, vy, vz = velocity_component(v, theta, phi)
    v_xy = sqrt(vx**2 + vy**2)
    a = (g/2) - B * vx**2 + C * vy **2
    b = vz
    landing_time = -b/a
    landing_distance = v_xy * landing_time
    return landing_distance
(4) 항력 요소를 발사체 궤적에 가미하기
실제 발사체는 공기저항을 받으므로 위 식그대로 날라가지는 않음
vx, vy, vz요소에 항력 영향을 가중치 0.1로하여 가미하면 다음과 같음

def trajectory3d(theta, phi, speed=20, height=0, dt=0.01, g=-9.81, elevation=flat_ground,drag=0):
    vx = speed * cos(pi * theta / 180) * cos(pi * phi / 180)
    vy = speed * cos(pi * theta / 180) * sin(pi * phi / 180)
    vz = speed * sin(pi * theta / 180)
    t, x, y, z = 0, 0, 0, height
    ts, xs, ys, zs = [t], [x], [y], [z]
    while z >= elevation(x, y):
        t += dt
        vx -= (drag * vx) * dt
        vy -= (drag * vy) * dt
        vz += (g - (drag * vz)) * dt
        x += vx * dt
        y += vy * dt
        z += vz * dt
        ts.append(t)
        xs.append(x)
        ys.append(y)
        zs.append(z)
    return ts, xs, ys, zs

plot_trajectories_3d(
    trajectory3d(20, -20, elevation=ridge),
    trajectory3d(20, -20, elevation=ridge, drag=0.1),
    bounds=[0,40,-40,0],
    elevation=ridge
)
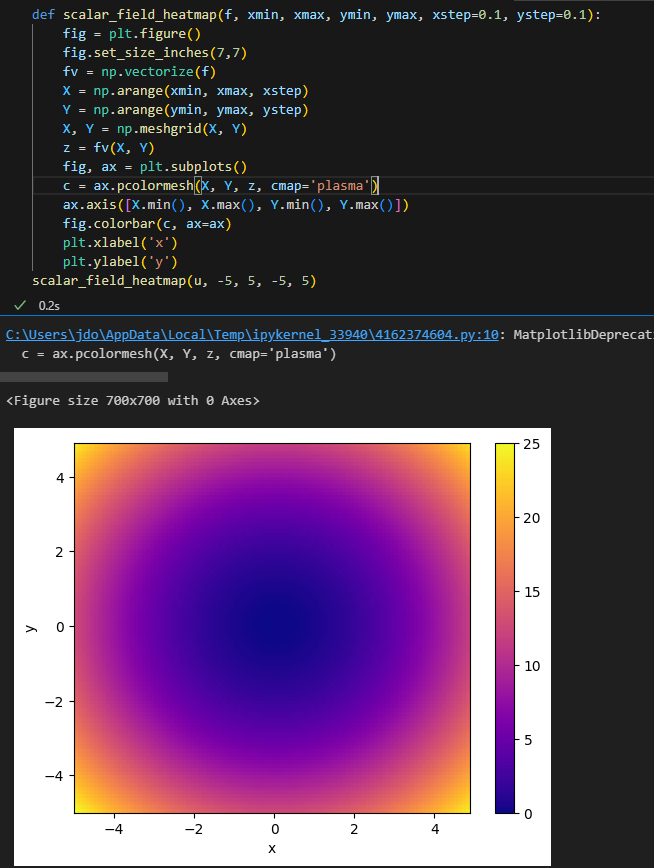
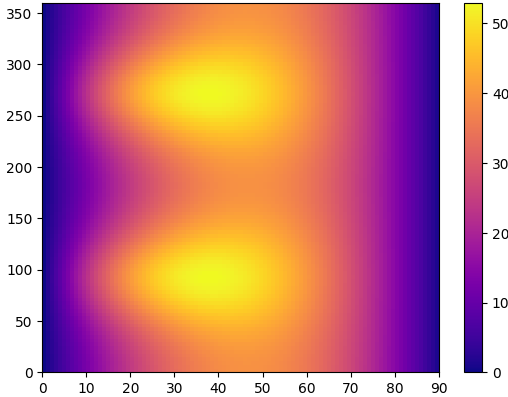
(5) xy 방향각에 따른 발사체 거리 스칼라 필드를 히트맵으로 시각화
아까 landing_distance 함수 구하긴 했는데 theta, phi에 따라 거리를 어떻게 시각화하지는 못했는데
거리 스칼라장을 히트맵으로 보여줄수 있음
히트맵으로 플로팅한 결과는 다음과 같다
발사각(y or x 축 회전) theta는 0 ~ 90도 사이
발사 방향(z축 회전) phi는 0 ~ 360도
릿지 지형에서 theta는 40, phi는 100, 270즘에서 가장 멀리 날라간다.
def scalar_field_heatmap(f, xmin, xmax, ymin, ymax, xsteps=100, ysteps=100):
    fig = plt.figure()
    fig.set_size_inches(7, 7)
    fv = np.vectorize(f)
    X = np.linspace(xmin, xmax, xsteps)
    Y = np.linspace(ymin, ymax, ysteps)
    X, Y = np.meshgrid(X, Y)
    z = fv(X, Y)

    fig, ax = plt.subplots()
    c = ax.pcolormesh(X, Y, z, cmap='plasma')
    ax.axis([X.min(), X.max(), Y.min(), Y.max()])
    fig.colorbar(c, ax=ax)

scalar_field_heatmap(landing_distance, 0, 90, 0, 360)
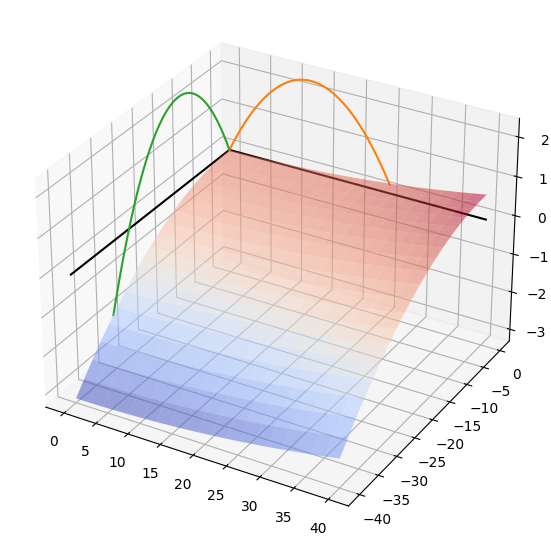
(6) 스칼라장을 히트맵 대신 3d에서 플로팅하기
스칼라장을 히트맵대신 서피스로 플로팅한 결과
봉우리 2개가 나오는데
이 두 지점에선 기울기가 0이 됨

def plot_scalar_field(f, xmin, xmax, ymin, ymax, xsteps=100, ysteps=100, c=None,cmap=cm.coolwarm, alpha=1,antialiased=False):
    fig = plt.gcf()
    fig.set_size_inches(7, 7)
    ax = fig.gca(projection='3d')
    fv = np.vectorize(f)
    X = np.linspace(xmin, xmax, xsteps)
    Y = np.linspace(ymin, ymax, ysteps)
    X, Y = np.meshgrid(X, Y)
    Z = fv(X, Y)
    surf = ax.plot_surface(X, Y, Z, cmap=cmap, color=c, alpha=alpha,
                          linewidth =0, antialiased=antialiased)

plot_scalar_field(landing_distance, 0, 90, 0, 360)
경사 상승을 이용한 최적화
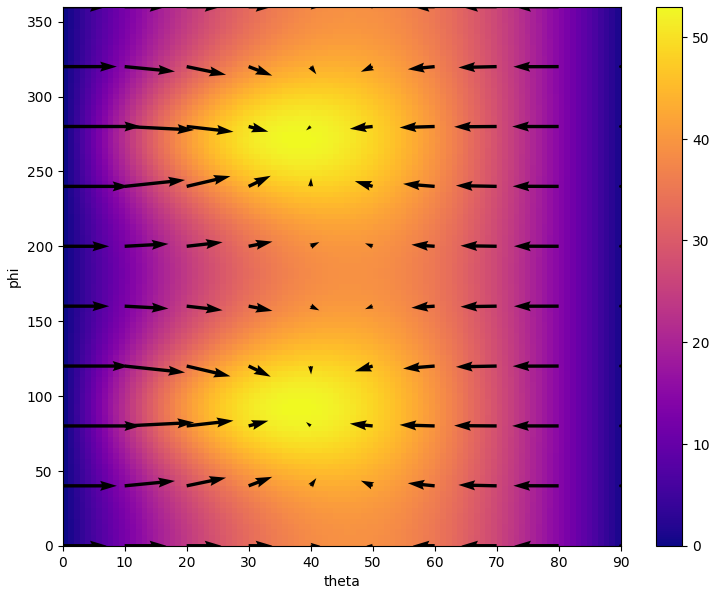
(1) 거리 히트맵과 경사 벡터장
경사 상승이라니 딥러닝 공부할때 생각나네
딥러닝에서는 비용 함수가 최소가 되는 방향으로 학습을 시켰는데
여기서는 비행체 거리가 최대가 되는 방향을 찾아서 경사 상승이라 하나보다
일단 경사와 관련된 함수부터 구현하자
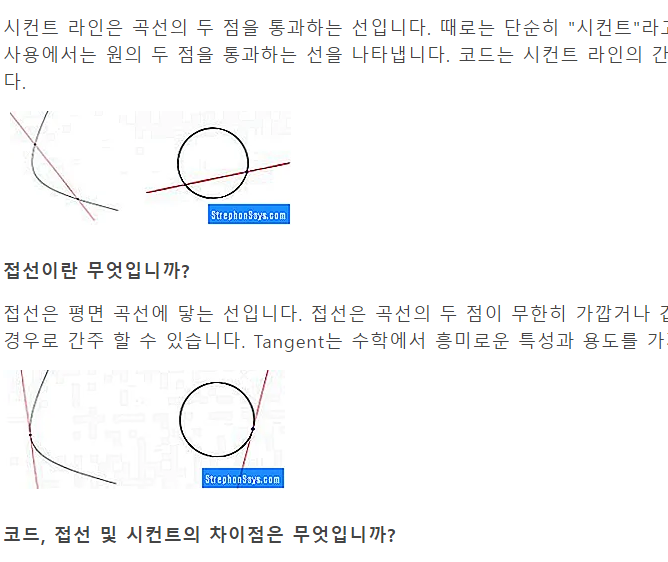
도함수 공식으로 시컨트 슬로프 함수 만들고
시컨트 슬로프로 근사 미분 함수를
근사 미분 함수로 근사 그라디언트 xy 방향 편미분 반환하는 함수 만든다..
그리고 이 함수와 도착거리함수로 도착 거리 그라디언트 함수 구현
def secant_slope(f, xmin, xmax):
    return (f(xmax) - f(xmin)) / (xmax - xmin)

def approx_derivative(f, x, dx=1e-6):
    return secant_slope(f, x-dx, x+dx)

def approx_gradient(f, x0, y0, dx=1e-6):
    partial_x = approx_derivative(lambda x: f(x, y0), x0, dx=dx)
    partial_y = approx_derivative(lambda y: f(x0, y), y0, dx=dx)
    return (partial_x, partial_y)

def landing_distance_gradient(theta, phi):
    return approx_gradient(landing_distance, theta, phi)
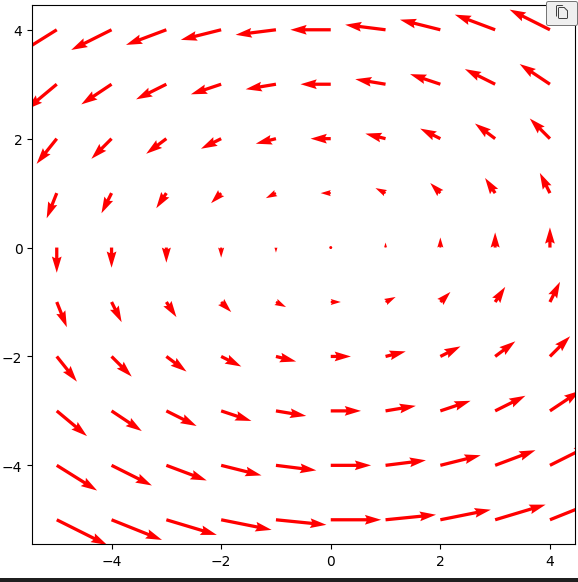
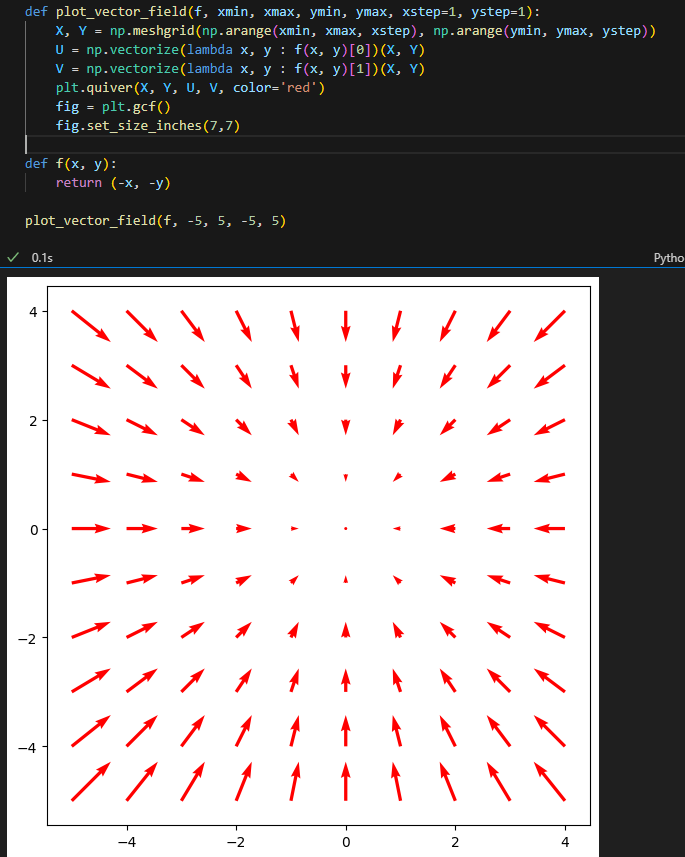
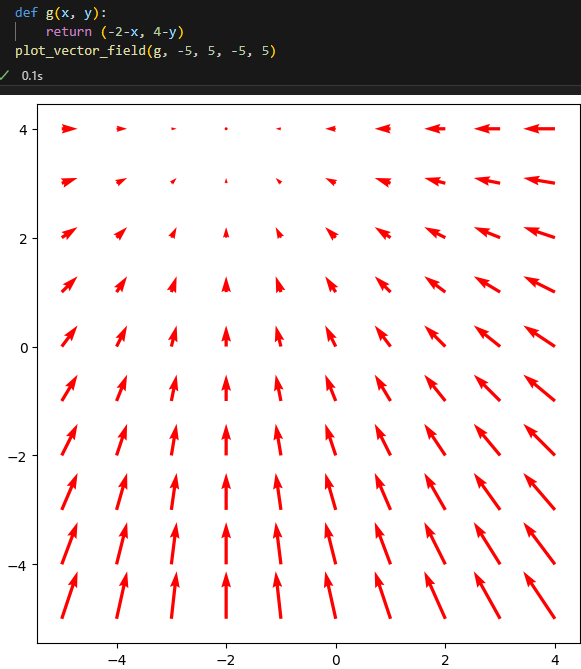
벡터장 플로팅 함수로 히트맵에다가 화살표들을 올림
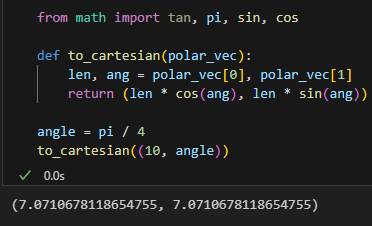
from vectors import to_polar, to_cartesian
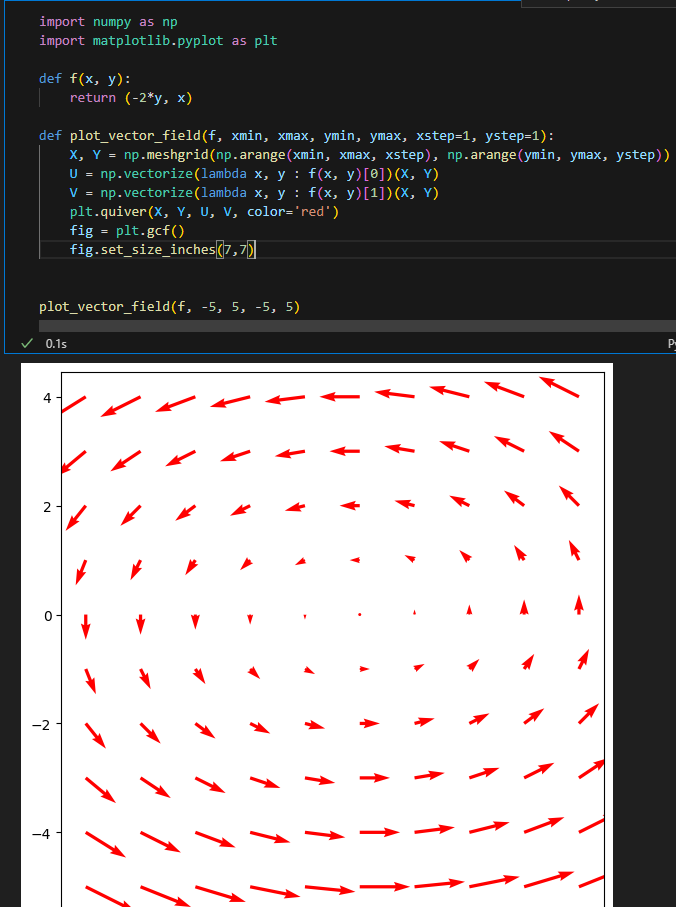
def plot_vector_field(f, xmin, xmax, ymin, ymax, xsteps=10, ysteps=10, color='k'):
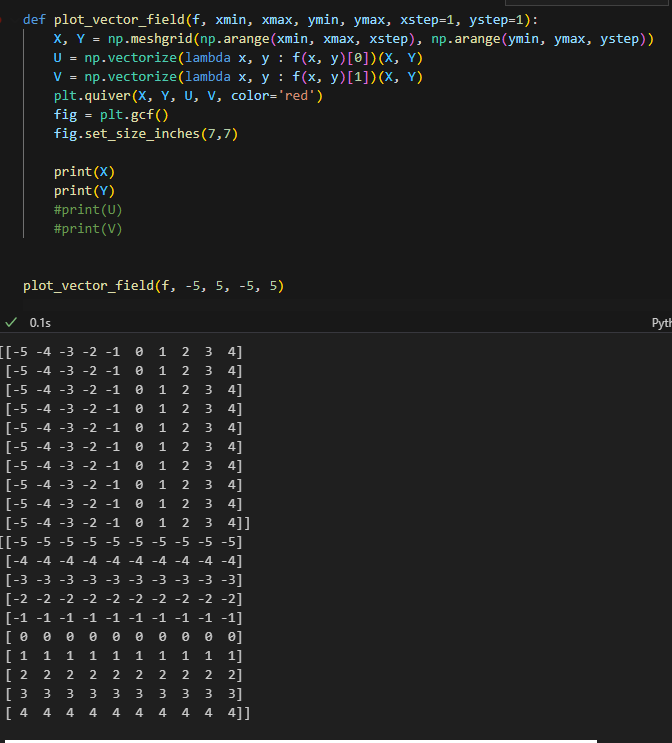
X, Y = np.meshgrid(np.linspace(xmin,xmax,xsteps), np.linspace(ymin, ymax, ysteps))
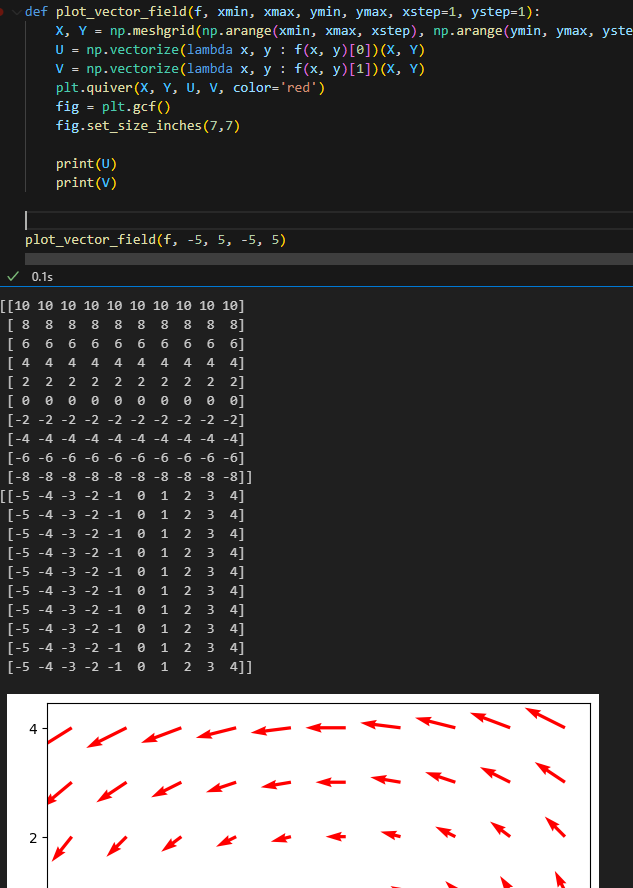
U = np.vectorize(lambda x, y : f(x, y)[0])(X, Y)
V = np.vectorize(lambda x, y : f(x, y)[1])(X, Y)
plt.quiver(X, Y, U, V, color=color)
fig = plt.gcf()
scalar_field_heatmap(landing_distance, 0, 90, 0, 360)
plot_vector_field(landing_distance_gradient, 0, 90, 0, 360, xsteps=10, ysteps=10, color='k')
plt.xlabel('theta')
plt.ylabel('phi')
plt.gcf().set_size_inches(9, 7)
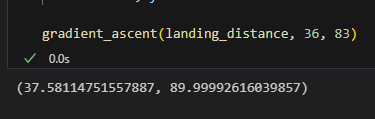
(2) 경사 상승법 구현하기
위에서 근사치 그라디언트 함수를 작성하여 벡터장 플로팅까지 했다
이번에는 이 근사 그라디언트로 경사 방향을 계속 올라 최대 지점까지 가는 함수 구현
36, 83을 줄시
끝점 37.58, 89.9에 도달함
 |
 |
from vectors import length

def gradient_ascent(f, xstart, ystart, tolerance=1e-6):
    x = xstart
    y = ystart
    grad = approx_gradient(f, x, y)
    while length(grad) > tolerance:
        x += grad[0]
        y += grad[1]
        grad = approx_gradient(f, x, y)
    return x, y

gradient_ascent(landing_distance, 36, 83)
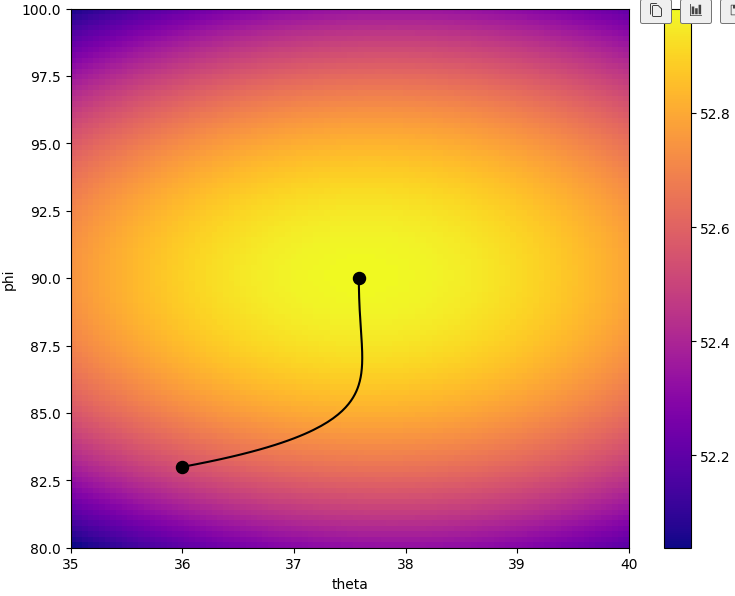
(3) 경사 상승 궤적 그리기
그라디언트 어센트 함수로 시작점을 주면 최적의 지점까지 찾는건 잘 됬는데
궤적을 드로잉해보면 다음과 같음
def gradient_ascent_points(f, xstart, ystart, tolerance=1e-6):
    x = xstart
    y = ystart
    xs, ys = [x], [y]
    grad = approx_gradient(f, x, y)
    while length(grad) > tolerance:
        x += grad[0]
        y += grad[1]
        grad = approx_gradient(f, x, y)
        xs.append(x)
        ys.append(y)
    return xs, ys

scalar_field_heatmap(landing_distance, 35, 40, 80, 100)

plt.plot(*gradient_ascent_points(landing_distance, 36, 83), c='k')
plt.scatter([36,37.58114751557887],[83,89.99992616039857],c='k',s=75)
plt.xlabel('theta')
plt.ylabel('phi')
plt.gcf().set_size_inches(9, 7)
'컴퓨터과학 > 응용수학' 카테고리의 다른 글
| 파이썬 수학 - 9. 장 시뮬레이션 (0) | 2023.10.01 |
|---|---|
| 파이썬 수학 - 8. 심볼릭 프로그래밍으로 대수 방정식 풀기 (0) | 2023.09.30 |
| 파이썬 수학 - 7. 오일러 방법으로 게임 개선 (0) | 2023.09.29 |
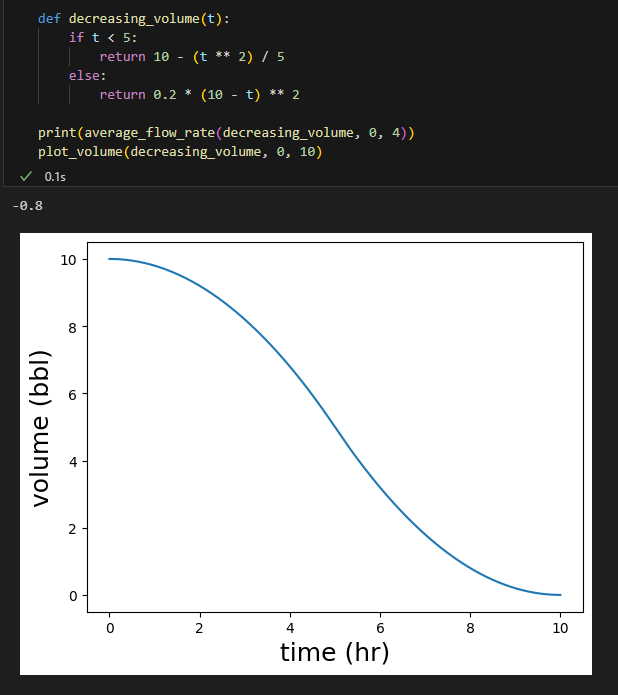
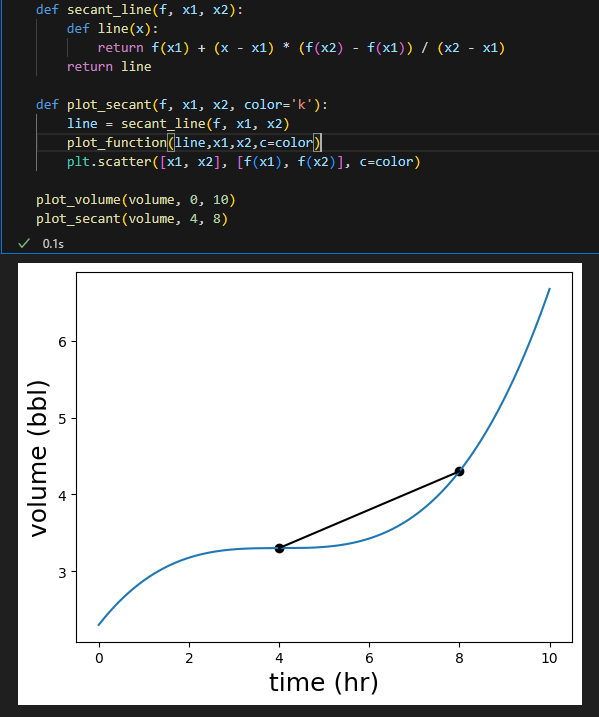
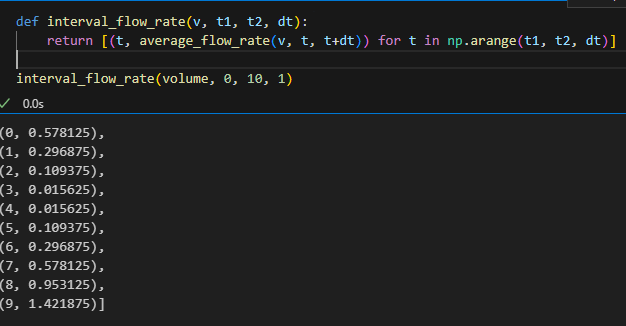
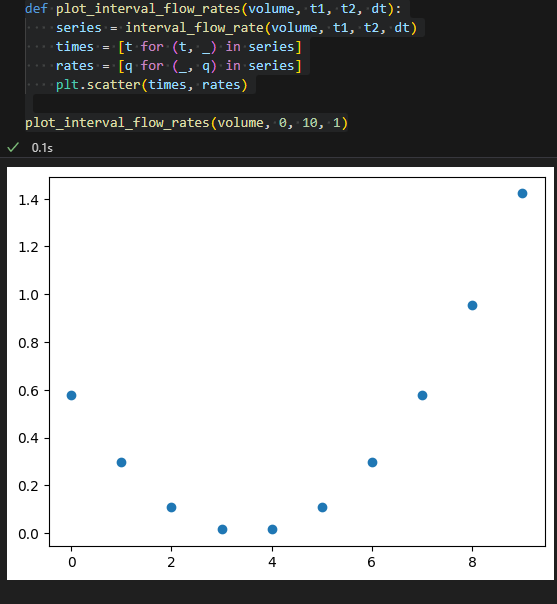
| 파이썬수학 - 6. 변화율기초 (0) | 2023.09.29 |
| 파이썬수학 - 5.게임과 연립일차식 풀기 (0) | 2023.09.25 |