이거 원래 numpy로 간단하게 하던건데 직접 구현해서 쓰자니
행렬 그냥 적어서 풀때 비해서 잘 이해가는 편은 아님
행렬과 벡터의 곱
이 코드에서 zip(matrix) 하면 기존 matrix 전치행렬 나오고
선형 결합 함수에서는 스칼라곱해서 더하면 원래 벡터 x 행렬 결과가 잘 나온다.
대신 로직은 좀 이해안가는데 대충 넘어가야할듯
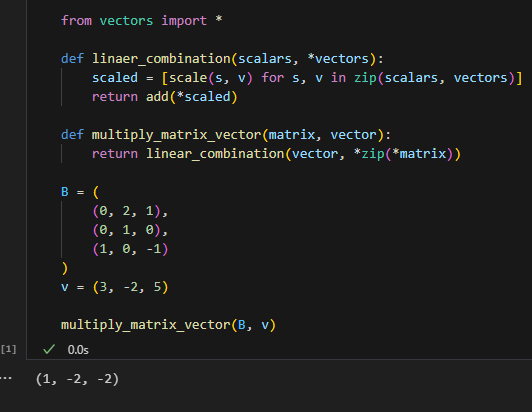
from vectors import *

def linaer_combination(scalars, *vectors):
    scaled = [scale(s, v) for s, v in zip(scalars, vectors)]
    return add(*scaled)

def multiply_matrix_vector(matrix, vector):
    return linear_combination(vector, *zip(*matrix))

B = (
    (0, 2, 1),
    (0, 1, 0),
    (1, 0, -1)
)
v = (3, -2, 5)

multiply_matrix_vector(B, v)
행렬간 곱셈 연산
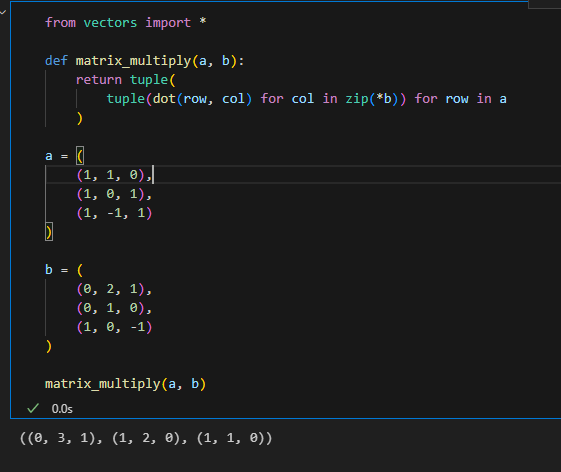
그나마 행렬 곱 연산 로직은 벡터 x 행렬보단 이해는 간다
대충 위 a, b 곱 연산 흐름을 적어보면 이런듯
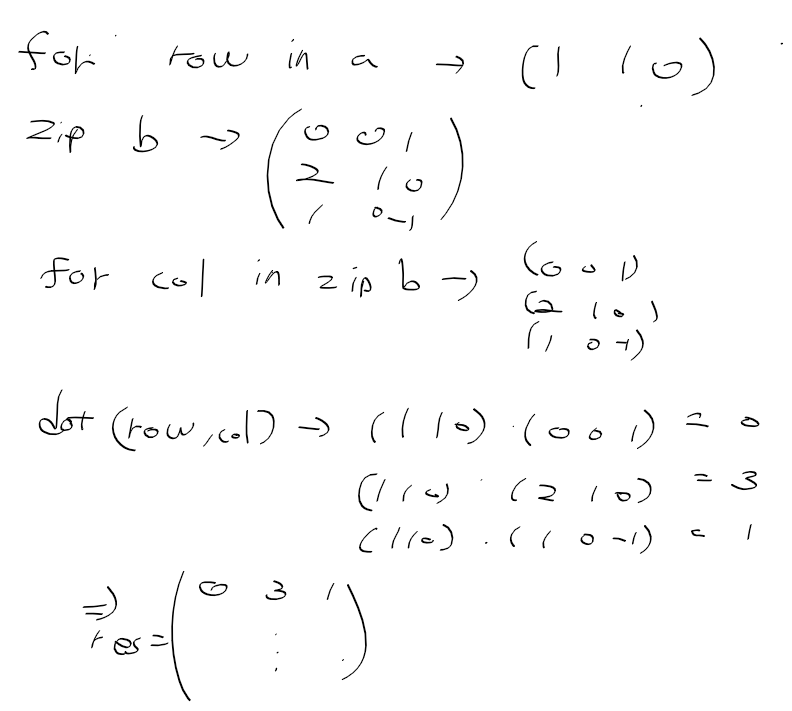
from vectors import *

def matrix_multiply(a, b):
    return tuple(
        tuple(dot(row, col) for col in zip(*b)) for row in a
    )

a = (
    (1, 1, 0),
    (1, 0, 1),
    (1, -1, 1)
)

b = (
    (0, 2, 1),
    (0, 1, 0),
    (1, 0, -1)
)

matrix_multiply(a, b)
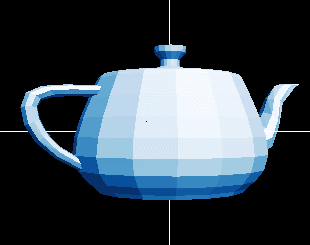
주전자 회전시키기
animate_teapot.py 코드를 보면 안에 시간에 따라 z축 회전 행렬을 반환하는 함수와
pygame으로 주전자 모델 드로잉 하는 함수가 제공되는데
여기다 정리하자니 너무 복잡해질것같고 그냥 캡처
from teapot import load_triangles
from draw_model import draw_model
from math import sin,cos

def get_rotation_matrix(t): #1
    seconds = t/1000 #2
    return (
        (cos(seconds),0,-sin(seconds)),
        (0,1,0),
        (sin(seconds),0,cos(seconds))
    )

####################################################################
#### this code takes a snapshot to reproduce the exact figure
#### shown in the book as an image saved in the "figs" directory
#### to run it, run this script with command line arg --snapshot
import sys
import camera
if '--snapshot' in sys.argv:
    camera.default_camera = camera.Camera('fig_5.4_draw_teapot',[0,1000,2000,3000,4000])
####################################################################

draw_model(load_triangles(), get_matrix=get_rotation_matrix)
3차원 공간에 공룡 그리기
이전에 2차원에 공룡 그린것과 큰 차이는 없고
기존의 공룡 벡터에다가 z축을 1로 추가해서 드로잉
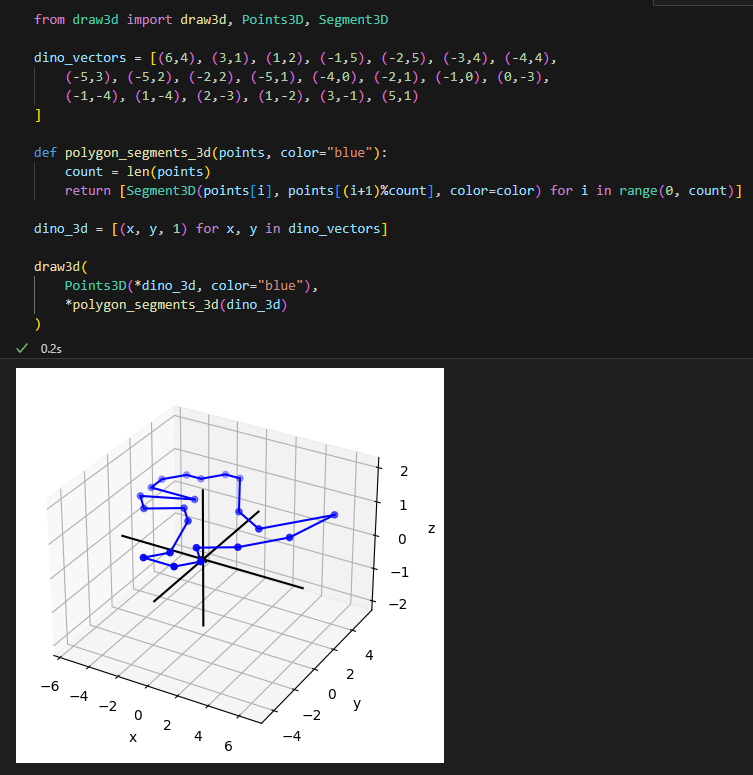
from draw3d import draw3d, Points3D, Segment3D

dino_vectors = [(6,4), (3,1), (1,2), (-1,5), (-2,5), (-3,4), (-4,4),
    (-5,3), (-5,2), (-2,2), (-5,1), (-4,0), (-2,1), (-1,0), (0,-3),
    (-1,-4), (1,-4), (2,-3), (1,-2), (3,-1), (5,1)
]

def polygon_segments_3d(points, color="blue"):
    count = len(points)
    return [Segment3D(points[i], points[(i+1)%count], color=color) for i in range(0, count)]

dino_3d = [(x, y, 1) for x, y in dino_vectors]

draw3d(
    Points3D(*dino_3d, color="blue"),
    *polygon_segments_3d(dino_3d)
)
행렬로 공룡 평행이동 시키기
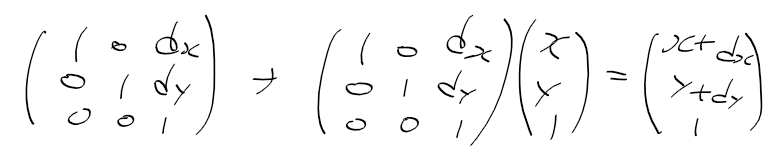
평행이동 행렬은 좌표 벡터와 곱하여 dx, dy값이 반영됨
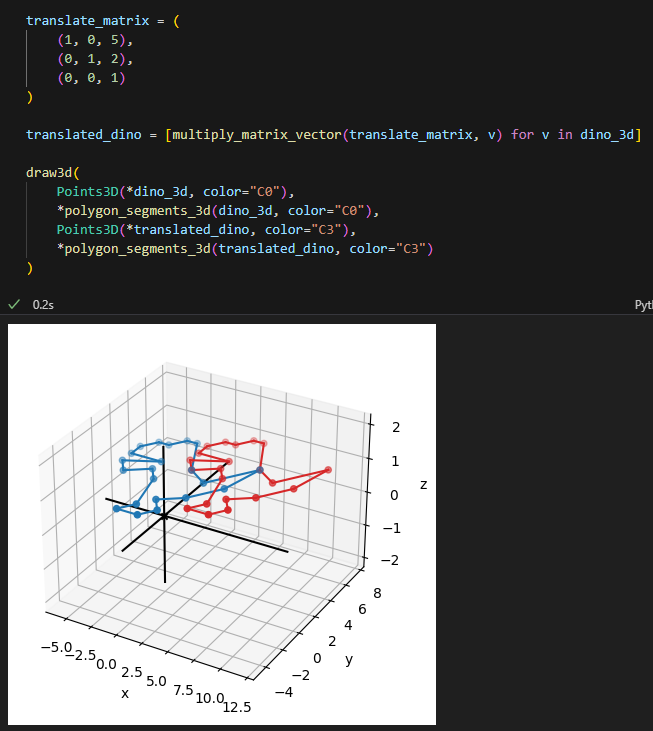
translate_matrix = (
    (1, 0, 5),
    (0, 1, 2),
    (0, 0, 1)
)

translated_dino = [multiply_matrix_vector(translate_matrix, v) for v in dino_3d]

draw3d(
    Points3D(*dino_3d, color="C0"),
    *polygon_segments_3d(dino_3d, color="C0"),
    Points3D(*translated_dino, color="C3"),
    *polygon_segments_3d(translated_dino, color="C3")
)
행렬로 회전 편행이동 시키기
이전 코드와 거의 비슷한데 행렬에 xy 회전할수 있도록 값을 변경하면 됨
2차원 회전 행렬은 이런 식, 90도 회전하는경우
cos 90 = 0, sin 90 = 1
R = [
[ 0 -1],
[1 0]
]
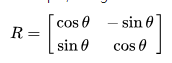
90도 회전하고, (5, 1)만큼 회전하는 경우 이런 식이 됨
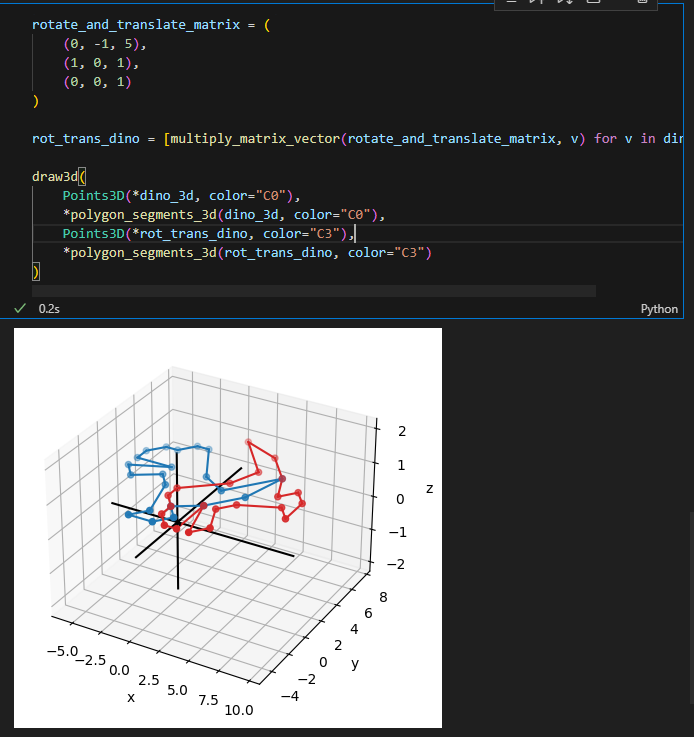
rotate_and_translate_matrix = (
    (0, -1, 5),
    (1, 0, 1),
    (0, 0, 1)
)

rot_trans_dino = [multiply_matrix_vector(rotate_and_translate_matrix, v) for v in dino_3d]

draw3d(
    Points3D(*dino_3d, color="C0"),
    *polygon_segments_3d(dino_3d, color="C0"),
    Points3D(*rot_trans_dino, color="C3"),
    *polygon_segments_3d(rot_trans_dino, color="C3")
)
곤란한게 여기 3d 예제 대부분은 pygame과 주전자 모델 사용해서 직접 구현하기가 곤란하다.
아쉬운데로 8면체를 갖고 적용해보면
8면체로 x, y, z축 평행이동
이전에 3차원 8면체 드로잉한걸 조금 수정함
아깐 3차원이긴 하나 z=1로 고정된 공룡을 xy축으로 평행, z로 회전하다보니 변환행렬은 (3x3)로 충분했지만
xyz 축 전체 회전/평행이동을 위해선 각 점 길이가 4인 벡터 (x, y, z, 1)를 쓰며 변환행렬은 4 x 4 형태이다.
(0, 0, 0)을중심으로 한 8면체를 (5, 3, 2)로 이동한 결과
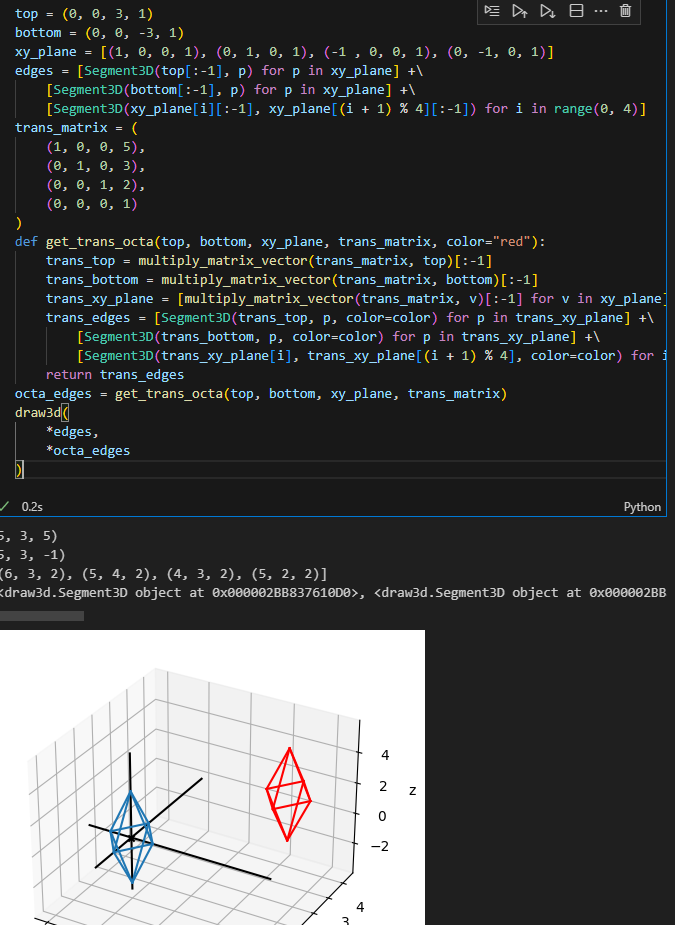
top = (0, 0, 3, 1)
bottom = (0, 0, -3, 1)
xy_plane = [(1, 0, 0, 1), (0, 1, 0, 1), (-1 , 0, 0, 1), (0, -1, 0, 1)]
edges = [Segment3D(top[:-1], p) for p in xy_plane] +\
    [Segment3D(bottom[:-1], p) for p in xy_plane] +\
    [Segment3D(xy_plane[i][:-1], xy_plane[(i + 1) % 4][:-1]) for i in range(0, 4)]
trans_matrix = (
    (1, 0, 0, 5),
    (0, 1, 0, 3),
    (0, 0, 1, 2),
    (0, 0, 0, 1)
)
def get_trans_octa(top, bottom, xy_plane, trans_matrix, color="red"):
    trans_top = multiply_matrix_vector(trans_matrix, top)[:-1]
    trans_bottom = multiply_matrix_vector(trans_matrix, bottom)[:-1]
    trans_xy_plane = [multiply_matrix_vector(trans_matrix, v)[:-1] for v in xy_plane]
    trans_edges = [Segment3D(trans_top, p, color=color) for p in trans_xy_plane] +\
        [Segment3D(trans_bottom, p, color=color) for p in trans_xy_plane] +\
        [Segment3D(trans_xy_plane[i], trans_xy_plane[(i + 1) % 4], color=color) for i in range(0, 4)]
    return trans_edges
octa_edges = get_trans_octa(top, bottom, xy_plane, trans_matrix)
draw3d(
    *edges,
    *octa_edges
)
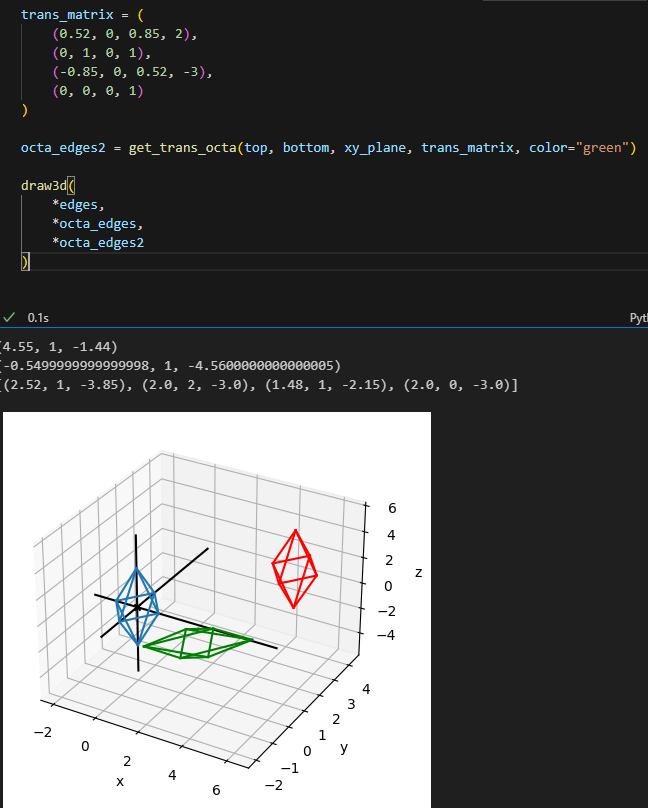
8면체 회전, 평행이동
방금 평행이동 했으니 이번엔 추가로 회전
아깐 공룡으로 z축 90도 회전했는데 이번엔 y축으로 45도 회전시켜보자
cos(45) = 0.52
sin(45) = 0.85

y축으로 45도보다 더 기울어진것 같긴한데 대충 회전한건 맞으니 넘어가자
'컴퓨터과학 > 응용수학' 카테고리의 다른 글
| 파이썬수학 - 6. 변화율기초 (0) | 2023.09.29 |
|---|---|
| 파이썬수학 - 5.게임과 연립일차식 풀기 (0) | 2023.09.25 |
| 파이썬수학 - 4. 벡터 깊게 다루기 (0) | 2023.09.25 |
| 파이썬수학 - 2. 3차원 다루기 (0) | 2023.09.23 |
| 파이썬수학 - 1. 2차원 드로잉 (0) | 2023.09.23 |