드디어 1장을 끝내고 2장으로 넘어왔다.
이번 장에서 구현해야할 논리 회로는
1. 반가산기
2. 전가산기
3. 16비트 전가산기
4. Incrementer 입력을 1씩 증가시키는건데 우리말로 뭐라해야할지 모르겠다. 그냥 증산기라 해야지
5. ALU
다음장(3장)에 레지스터, 메모리를 만들고 다다다음장(5장)에서 CPU 만들고,
io장치를 어째저째해주면 하드웨어 구현은 끝이다.
아 다음 장을 넘어가면 이전 장에서 구현한 논리회로 대신
빌트인 폴더 안에 있는 이미 만들어진 논리회로를 사용한다.
내용은 잘 생각 안나지만 1장에서 한거처럼 난드게이트로 만들수 있는걸 연습해봤고
최적화 문제로 이전 장에서 만든것보다는 빨리 동작가능한 빌트인 된걸 사용한다고 나왔던거같다.
1. 반가산기
반가산기의 진리표, 입출력, 구조는 아래와 같다.

그대로 hdl을 작성해서 돌리면
CHIP HalfAdder {
    IN a, b;    // 1-bit inputs
    OUT sum,    // Right bit of a + b
        carry;  // Left bit of a + b

    PARTS:
    Xor(a=a, b=b, out=sum);
    And(a=a, b=b, out=carry);
}
잘 된다.

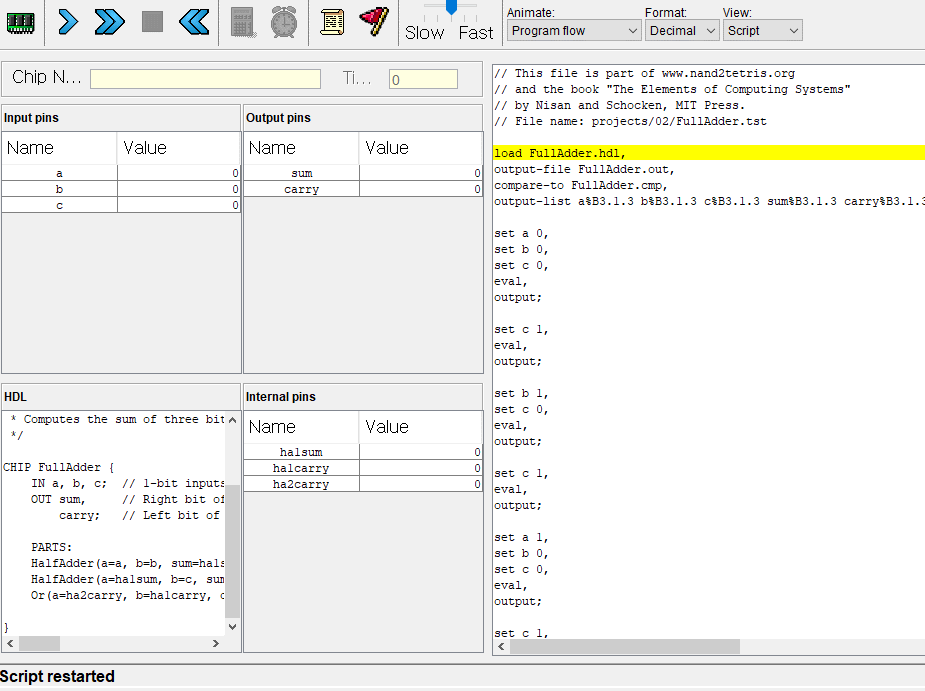
2. 전가산기
이번에는 전가산기
반가산기와 차이점이라면 캐리도 같이 입력받아서 가산연산을한다.
반가산기 2개와 or 게이트 1개로 만들 수있다.
진리표는 생략

CHIP FullAdder {
    IN a, b, c;  // 1-bit inputs
    OUT sum,     // Right bit of a + b + c
        carry;   // Left bit of a + b + c

    PARTS:
    HalfAdder(a=a, b=b, sum=ha1sum, carry=ha1carry);
    HalfAdder(a=ha1sum, b=c, sum=sum, carry=ha2carry);
    Or(a=ha2carry, b=ha1carry, out=carry);
}
캐리도 입력받지만 가산연산이 잘되고있다.
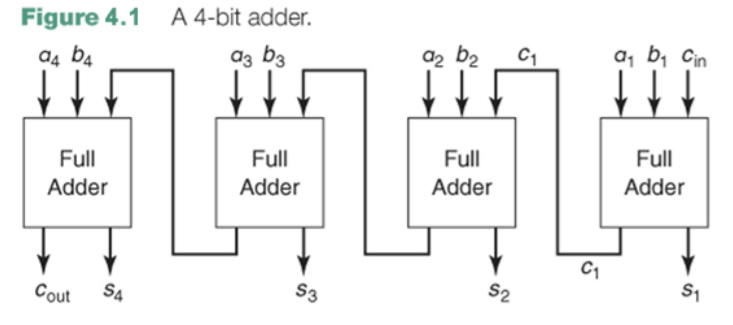
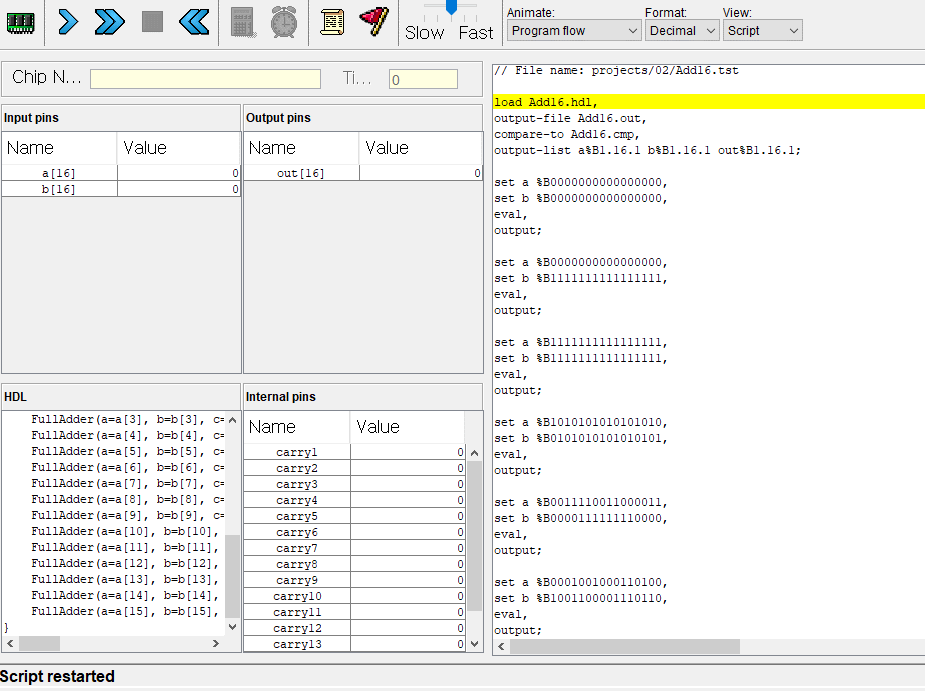
3. 16비트 전가산기
이번에는 16비트 전가산기. 처음에는 캐리가 없으니 반가산기 쓰고 뒤에서부터는 전가산기 15개 정도 쓰면될거같다.
4비트 전가산기의 경우 아래의 그림과 같으니 참고해서 작성해보자
CHIP Add16 {
    IN a[16], b[16];
    OUT out[16];

    PARTS:
    HalfAdder(a=a[0], b=b[0], sum=out[0], carry=carry1);
    FullAdder(a=a[1], b=b[1], c=carry1, sum=out[1], carry=carry2);
    FullAdder(a=a[2], b=b[2], c=carry2, sum=out[2], carry=carry3);
    FullAdder(a=a[3], b=b[3], c=carry3, sum=out[3], carry=carry4);
    FullAdder(a=a[4], b=b[4], c=carry4, sum=out[4], carry=carry5);
    FullAdder(a=a[5], b=b[5], c=carry5, sum=out[5], carry=carry6);
    FullAdder(a=a[6], b=b[6], c=carry6, sum=out[6], carry=carry7);
    FullAdder(a=a[7], b=b[7], c=carry7, sum=out[7], carry=carry8);
    FullAdder(a=a[8], b=b[8], c=carry8, sum=out[8], carry=carry9);
    FullAdder(a=a[9], b=b[9], c=carry9, sum=out[9], carry=carry10);
    FullAdder(a=a[10], b=b[10], c=carry10, sum=out[10], carry=carry11);
    FullAdder(a=a[11], b=b[11], c=carry11, sum=out[11], carry=carry12);
    FullAdder(a=a[12], b=b[12], c=carry12, sum=out[12], carry=carry13);
    FullAdder(a=a[13], b=b[13], c=carry13, sum=out[13], carry=carry14);
    FullAdder(a=a[14], b=b[14], c=carry14, sum=out[14], carry=carry15);
    FullAdder(a=a[15], b=b[15], c=carry15, sum=out[15]);
}
4. Incrementer
이번에는 증산기 차례인데, 16비트 입력에다가 1만 더해주면 된다.
그러니까 전가산기에다가 뭘 더붙이면 될거같긴한데
아니다 16비트 전가산기에서 맨 앞에 반가산기 b에다가 한번 True를 주고
나머지 전가산기의 b에는 0 그러니까 False를 주면 될거같다.
CHIP Inc16 {
    IN in[16];
    OUT out[16];

    PARTS:
    HalfAdder(a=in[0], b=true, sum=out[0], carry=carry1);
    FullAdder(a=in[1], b=false, c=carry1, sum=out[1], carry=carry2);
    FullAdder(a=in[2], b=false, c=carry2, sum=out[2], carry=carry3);
    FullAdder(a=in[3], b=false, c=carry3, sum=out[3], carry=carry4);
    FullAdder(a=in[4], b=false, c=carry4, sum=out[4], carry=carry5);
    FullAdder(a=in[5], b=false, c=carry5, sum=out[5], carry=carry6);
    FullAdder(a=in[6], b=false, c=carry6, sum=out[6], carry=carry7);
    FullAdder(a=in[7], b=false, c=carry7, sum=out[7], carry=carry8);
    FullAdder(a=in[8], b=false, c=carry8, sum=out[8], carry=carry9);
    FullAdder(a=in[9], b=false, c=carry9, sum=out[9], carry=carry10);
    FullAdder(a=in[10], b=false, c=carry10, sum=out[10], carry=carry11);
    FullAdder(a=in[11], b=false, c=carry11, sum=out[11], carry=carry12);
    FullAdder(a=in[12], b=false, c=carry12, sum=out[12], carry=carry13);
    FullAdder(a=in[13], b=false, c=carry13, sum=out[13], carry=carry14);
    FullAdder(a=in[14], b=false, c=carry14, sum=out[14], carry=carry15);
    FullAdder(a=in[15], b=false, c=carry15, sum=out[15]);
}
5. ALU
앞서 본 회로들은 금방 했고,
이번에는 이 장에서 가장 중요한 ALU를 만들고자 한다.
hack의 ALU는 다음 구조와 입출력 관계를 갖는다.
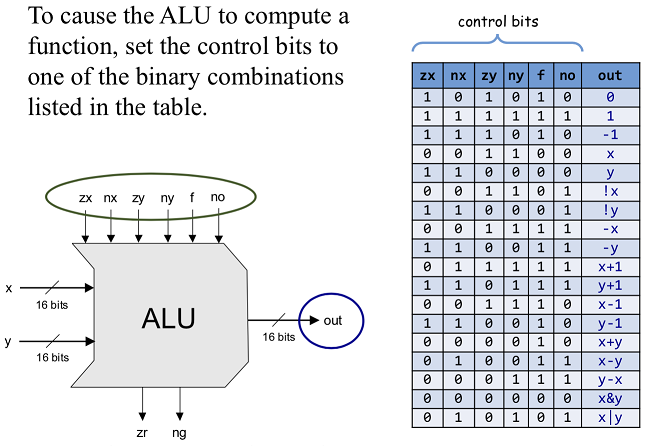
생긴거만 봐도 참 골치아프게 생겼다.
입력으로 16비트짜리 x,y와 컨트롤비트 zx,nx,zy,ny, f, no가 있는데
zx,zy야 xy를 0으로 만들지 고르는거고, nx,ny는 부정연산을 한다.
f는 1일때 엔드연산, no는 출력을 부정하는 내용이다.
출력에는 16비트 out과 zr, ng가 있는데
zr의 경우 out이 0일때 1이 되고, ng의 경우 out이 음수인 경우 1이 되어 출력 결과의 상태를 나타낸다.
일단 zxy, nxy 논리연산부터 구현해보자.
z가 들어가면 0과 and16 연산을 하면되고
n이 들어가면 16비트 입력을 not16해주면 될거같다.
일단 zx값에 따라 0 or x가 나오도록 해봤다.
CHIP ALU {
    IN
        x[16], y[16],  // 16-bit inputs
        zx, // zero the x input?
        nx, // negate the x input?
        zy, // zero the y input?
        ny, // negate the y input?
        f,  // compute out = x + y (if 1) or x & y (if 0)
        no; // negate the out output?

    OUT
        out[16], // 16-bit output
        zr, // 1 if (out == 0), 0 otherwise
        ng; // 1 if (out < 0),  0 otherwise

    PARTS:
    Mux16(a=x, b=false, sel=zx, out=out); //  zx == 0 ? x : 0000000..
}
제대로 구현한게 아니니까 진행 안되는게 맞기도하고 ,
생각한데로 x에 17이 들어갈때 zx=0이면 x가 나오고, 1이면 0이 뜬다.(mux16의 out을 바로 최종 출력으로보냇으니)

일단 이런 느낌으로 한번 그림으로 그리면
일단 nx, ny까지는 그렸다.

이제 f와 no만 고려하면 되는데,
no야 앞에서 zxout한거 처럼 not 돌리면되니까 문제없고 f랑 zr, ng 부분만 더 생각해보자
if f == 1 ? x + y : x & y이고, mux는 sel이 1일때 아래거(b)를 내보내니
mux a = and(x,y), b=or(x,y), sel=f 대강 이런식이면 될거같다.
zr, ng 빼고는 완성!

일단 out만 생각한데로 되는지 보자
CHIP ALU {
    IN
        x[16], y[16],  // 16-bit inputs
        zx, // zero the x input?
        nx, // negate the x input?
        zy, // zero the y input?
        ny, // negate the y input?
        f,  // compute out = x + y (if 1) or x & y (if 0)
        no; // negate the out output?

    OUT
        out[16], // 16-bit output
        zr, // 1 if (out == 0), 0 otherwise
        ng; // 1 if (out < 0),  0 otherwise

    PARTS:
    Mux16(a=x, b=false, sel=zx, out=zxout);
    Mux16(a=y, b=false, sel=zy, out=zyout);

    Not16(in=zxout, out=notzxout);
    Not16(in=zyout, out=notzyout);
    Mux16(a=zxout, b=notzxout, sel=nx, out=nxout);
    Mux16(a=zyout, b=notzyout, sel=ny, out=nyout);

    And16(a=nxout, b=nyout, out=andout);
    Or16(a=nxout, b=nyout, out=orout);
    Mux16(a=andout, b=orout, sel=f, out=fout);

    Not16(in=fout, out=notfout);
    Mux16(a=fout, b=notfout, sel=no, out=out);
}
계산이 되기는한데 생각한거랑은 좀 다르게 나온다..
자꾸 에러때문에 막혀서 일단 zr, ng부터 구현하고 다시 보자
zr은 연산 결과가 0인 경우 1이 되는거니
기존의 out을 mux sel단자에 넣어서 쓰려고 했는데
mux16 sel은 1비트, out은 16비트다.

out 모든 비트를 or연산한 결과가 0이면 zr = 1, 아니면 zr=0이 되도록
우선 out을 or16 돌린뒤에 sel에 넣으면 될거같다.
다시보니 or 16은 16비트 두입력 or연산이었네
Or8way 두개, or 1개 쓰자.
CHIP ALU {
    IN
        x[16], y[16],  // 16-bit inputs
        zx, // zero the x input?
        nx, // negate the x input?
        zy, // zero the y input?
        ny, // negate the y input?
        f,  // compute out = x + y (if 1) or x & y (if 0)
        no; // negate the out output?

    OUT
        out[16], // 16-bit output
        zr, // 1 if (out == 0), 0 otherwise
        ng; // 1 if (out < 0),  0 otherwise

    PARTS:
    Mux16(a=x, b=false, sel=zx, out=zxout);
    Mux16(a=y, b=false, sel=zy, out=zyout);

    Not16(in=zxout, out=notzxout);
    Not16(in=zyout, out=notzyout);
    Mux16(a=zxout, b=notzxout, sel=nx, out=nxout);
    Mux16(a=zyout, b=notzyout, sel=ny, out=nyout);

    And16(a=nxout, b=nyout, out=andout);
    Or16(a=nxout, b=nyout, out=orout);
    Mux16(a=andout, b=orout, sel=f, out=fout);

    Not16(in=fout, out=notfout);
    Mux16(a=fout, b=notfout, sel=no, out[0..7]=out0to7, out[8..15]=out8to15, out=out);

    Or8Way(in=out0to7, out=or8way1out);
    Or8Way(in=out8to15, out=or8way2out);
    Or(a=or8way1out, b=or8way2out, out=zrsel);
    Mux(a=true, b=false, sel=zrsel, out=zr);
}
zr도 구현을 잘 했는데
컨트롤비트가 111111인경우 왜 1이 나오는지 잘 이해가 안된다.
계산도 해보니 ng는 그렇다쳐도 값이 좀 이상하게 나온다.

다시 진리 테이블을 보니
f=1 일때 or연산이 아니라 + 연산을 해야되더라. +라길래 or연산을 의미하는줄알았다.
Or16을 Add16으로 바꿔줫더니 out 결과는 잘나온다.
이제마지막으로 ng만 처리해주면된다.
ng야 MSB가 1이면 음수로 보면 되니까 mux에 바로연결하자.
sel = 1- > ng = 1
sel = 0 -> ng = 0

으아아아 드디여 진리표만 보고 그림그려서 alu를 구현했다
CHIP ALU {
    IN
        x[16], y[16],  // 16-bit inputs
        zx, // zero the x input?
        nx, // negate the x input?
        zy, // zero the y input?
        ny, // negate the y input?
        f,  // compute out = x + y (if 1) or x & y (if 0)
        no; // negate the out output?

    OUT
        out[16], // 16-bit output
        zr, // 1 if (out == 0), 0 otherwise
        ng; // 1 if (out < 0),  0 otherwise

    PARTS:
    Mux16(a=x, b=false, sel=zx, out=zxout);
    Mux16(a=y, b=false, sel=zy, out=zyout);

    Not16(in=zxout, out=notzxout);
    Not16(in=zyout, out=notzyout);
    Mux16(a=zxout, b=notzxout, sel=nx, out=nxout);
    Mux16(a=zyout, b=notzyout, sel=ny, out=nyout);

    And16(a=nxout, b=nyout, out=andout);
    Add16(a=nxout, b=nyout, out=addout);
    Mux16(a=andout, b=addout, sel=f, out=fout);

    Not16(in=fout, out=notfout);
    Mux16(a=fout, b=notfout, sel=no, out[0..7]=out0to7, out[8..15]=out8to15, out[15]=out15, out=out);

    Or8Way(in=out0to7, out=or8way1out);
    Or8Way(in=out8to15, out=or8way2out);
    Or(a=or8way1out, b=or8way2out, out=zrsel);
    Mux(a=true, b=false, sel=zrsel, out=zr);

    Mux(a=false, b=true, sel=out15, out=ng);
}

2년 전쯤에 했을때는 ALU를 넘기지 못했는데
드디어 해냈다!
이제 기억장치가 포함된 순차논리회로를 만들고 cpu까지 가면 된다.
'컴퓨터과학 > 디지털회로' 카테고리의 다른 글
| nand2tetris - 6. hack 기계어와 어셈블리어 1 (0) | 2022.05.16 |
|---|---|
| nand2tetris - 5. 레지스터와 RAM 구현하기 (0) | 2022.05.15 |
| nand2tetris - 3. 4way/8way 16bit muletiplexer까지 기본논리회로 마무리 (0) | 2022.05.15 |
| nand2tetris- 2. Xor부터 8way Demultiplexer까지 (0) | 2022.05.15 |
| nand2tetris- 1. 소개, NAND 게이트로 Not, And, OR 게이트 구현하기 (0) | 2022.05.14 |