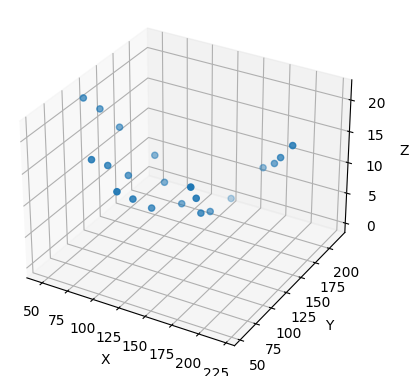
import numpy as np
import matplotlib.pyplot as plt
# 데이터 분리
x = denormalize_landmark[:, 0]
y = denormalize_landmark[:, 1]
z = denormalize_landmark[:, 2]
# 3차원 시각화
fig = plt.figure()
ax = fig.add_subplot(111, projection='3d')
ax.scatter(x, y, z)
# 축 레이블 설정
ax.set_xlabel('X')
ax.set_ylabel('Y')
ax.set_zlabel('Z')
# 그래프 출력
plt.show()
화면을 돌리면서 보기위해
%matplotlib widget하는데
ipympl이없단다.
!pip install ipympl
핍으로 설치뒤에
다시 %matplotlib widget 하면 ok
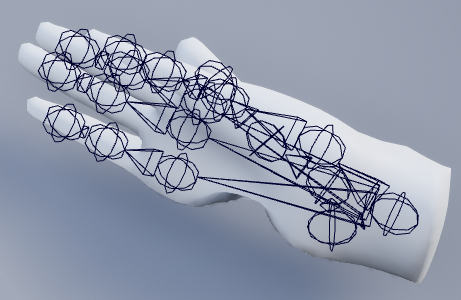
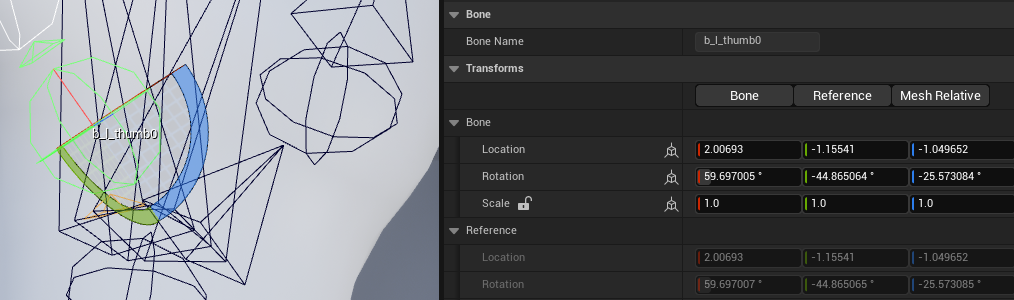
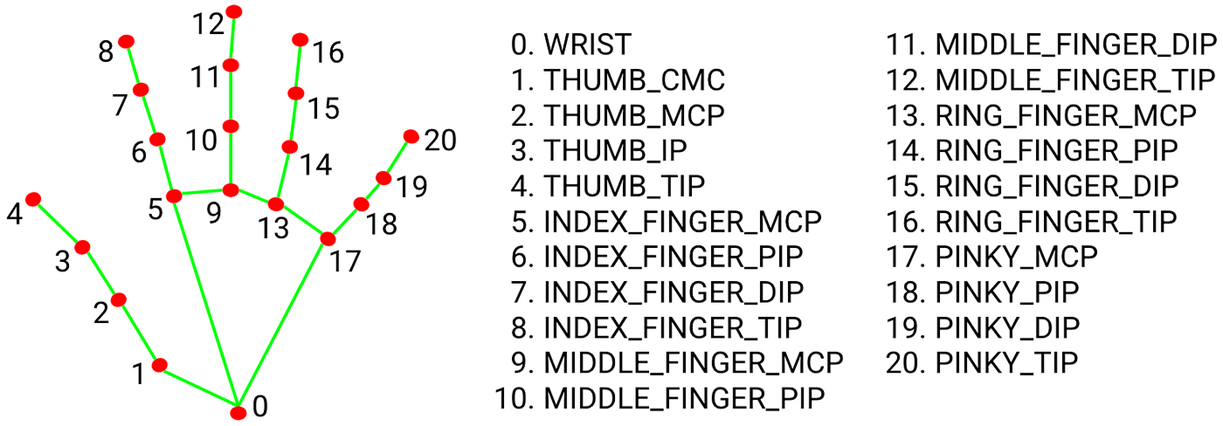
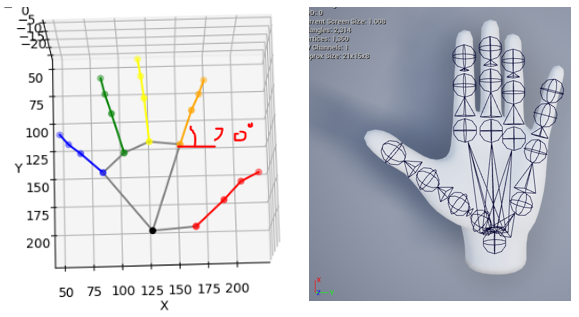
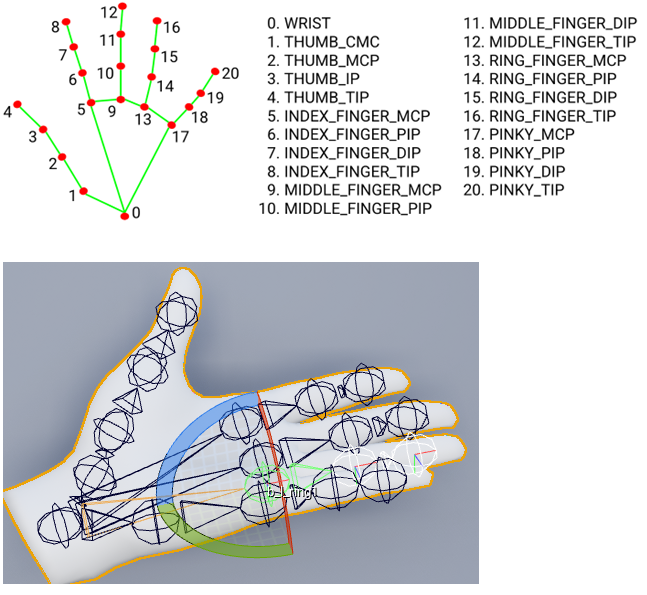
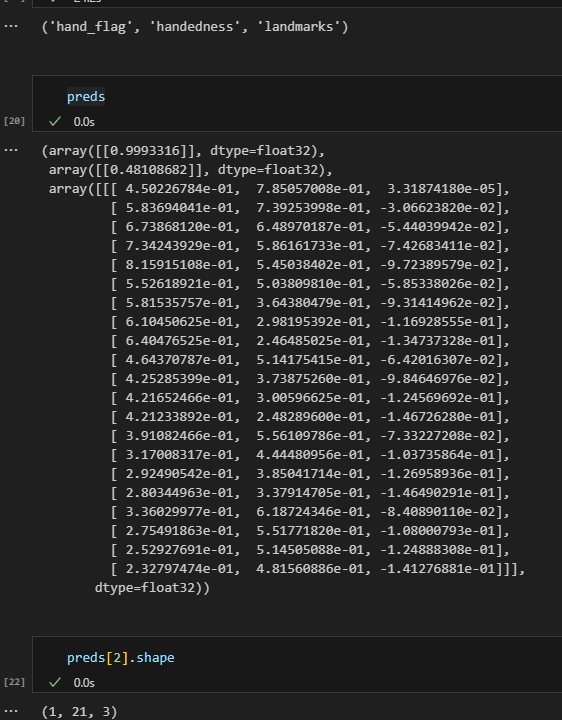
1~4는 엄지
5~6 검지
9~12 중지
13~16 약지
17~20 소지
이므로 색을 따로 줘서 플로팅하면
import matplotlib.pyplot as plt
import numpy as np
import pandas as pd
%matplotlib widget
# 색상 지정
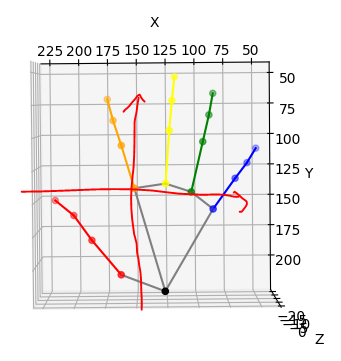
colors = ['black'] + ['red'] * 4 + ['orange'] * 4 + ['yellow'] * 4 + ['green'] * 4 + ['blue'] * 4
# 3차원 산점도 그리기
fig = plt.figure()
ax = fig.add_subplot(111, projection='3d')
x = denormalize_landmark[:, 0]
y = denormalize_landmark[:, 1]
z = denormalize_landmark[:, 2]
ax.scatter(x, y, z, c=colors)
ax.set_xlabel('X')
ax.set_ylabel('Y')
ax.set_zlabel('Z')
plt.show()
import matplotlib.pyplot as plt
import numpy as np
import pandas as pd
%matplotlib widget
# 3차원 산점도 그리기
fig = plt.figure()
ax = fig.add_subplot(111, projection='3d')
x = denormalize_landmark[:, 0]
y = denormalize_landmark[:, 1]
z = denormalize_landmark[:, 2]
# 색상 지정
colors = ['black'] + ['red'] * 4 + ['orange'] * 4 + ['yellow'] * 4 + ['green'] * 4 + ['blue'] * 4
ax.scatter(x, y, z, c=colors)
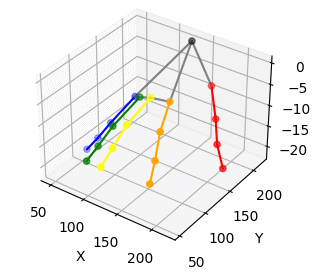
#손가락
colors = ['red', 'orange', 'yellow', 'green', 'blue']
groups = [[1, 2, 3, 4], [5, 6, 7, 8], [9, 10, 11, 12], [13, 14, 15, 16], [17, 18, 19, 20]]
for i, group in enumerate(groups):
for j in range(len(group)-1):
plt.plot([x[group[j]], x[group[j+1]]], [y[group[j]], y[group[j+1]]], [z[group[j]], z[group[j+1]]], color=colors[i])
#손등
lines = [[0, 1], [0, 5], [0, 17], [5, 9], [9, 13], [13, 17]]
for line in lines:
ax.plot([x[line[0]], x[line[1]]], [y[line[0]], y[line[1]]], [z[line[0]], z[line[1]]], color='gray')
ax.set_xlabel('X')
ax.set_ylabel('Y')
ax.set_zlabel('Z')
plt.show()
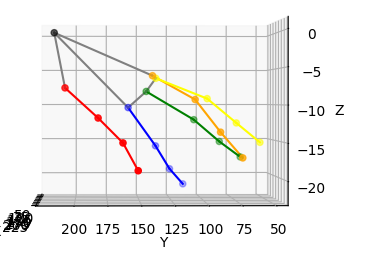
하면서보니 모양이 조금이상한것 같아서
z에 -1해줫는데
손목 z가 0을 기준으로 시작하는듯하다.
import matplotlib.pyplot as plt
import numpy as np
import pandas as pd
%matplotlib widget
# 3차원 산점도 그리기
fig = plt.figure()
ax = fig.add_subplot(111, projection='3d')
x = denormalize_landmark[:, 0]
y = denormalize_landmark[:, 1]
z = denormalize_landmark[:, 2] * -1
# 색상 지정
colors = ['black'] + ['red'] * 4 + ['orange'] * 4 + ['yellow'] * 4 + ['green'] * 4 + ['blue'] * 4
ax.scatter(x, y, z, c=colors)
#손가락
colors = ['red', 'orange', 'yellow', 'green', 'blue']
groups = [[1, 2, 3, 4], [5, 6, 7, 8], [9, 10, 11, 12], [13, 14, 15, 16], [17, 18, 19, 20]]
for i, group in enumerate(groups):
for j in range(len(group)-1):
plt.plot([x[group[j]], x[group[j+1]]], [y[group[j]], y[group[j+1]]], [z[group[j]], z[group[j+1]]], color=colors[i])
#손등
lines = [[0, 1], [0, 5], [0, 17], [5, 9], [9, 13], [13, 17]]
for line in lines:
ax.plot([x[line[0]], x[line[1]]], [y[line[0]], y[line[1]]], [z[line[0]], z[line[1]]], color='gray')
ax.set_xlabel('X')
ax.set_ylabel('Y')
ax.set_zlabel('Z')
plt.show()
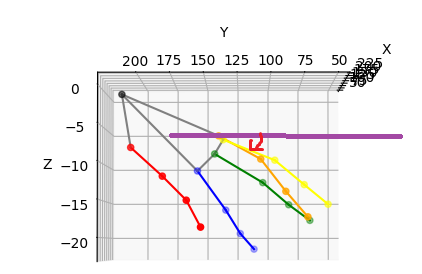
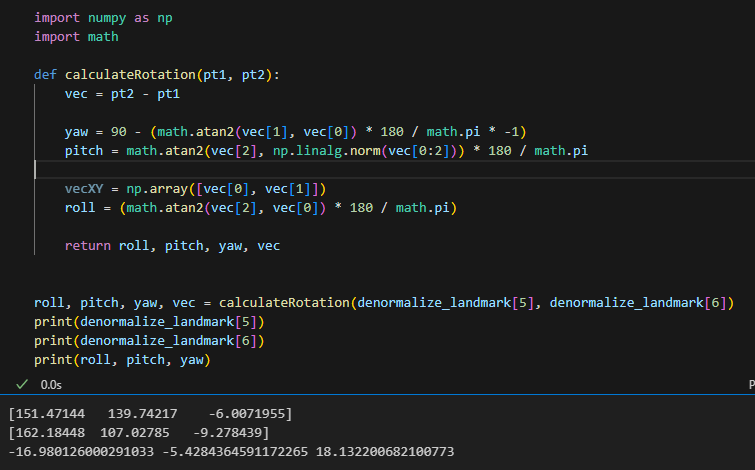
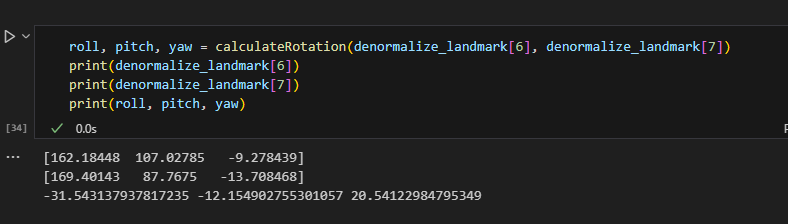
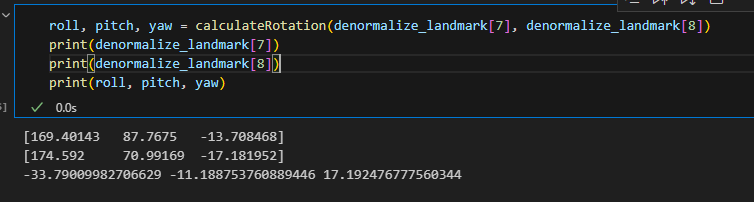
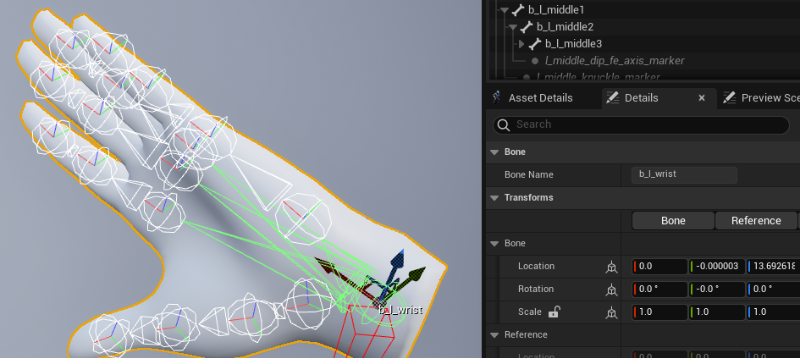
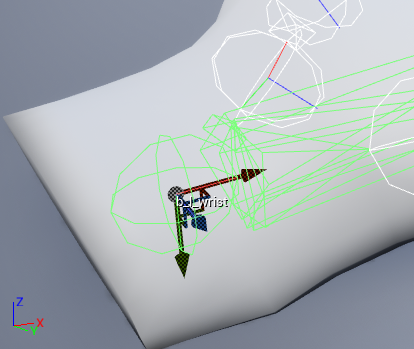
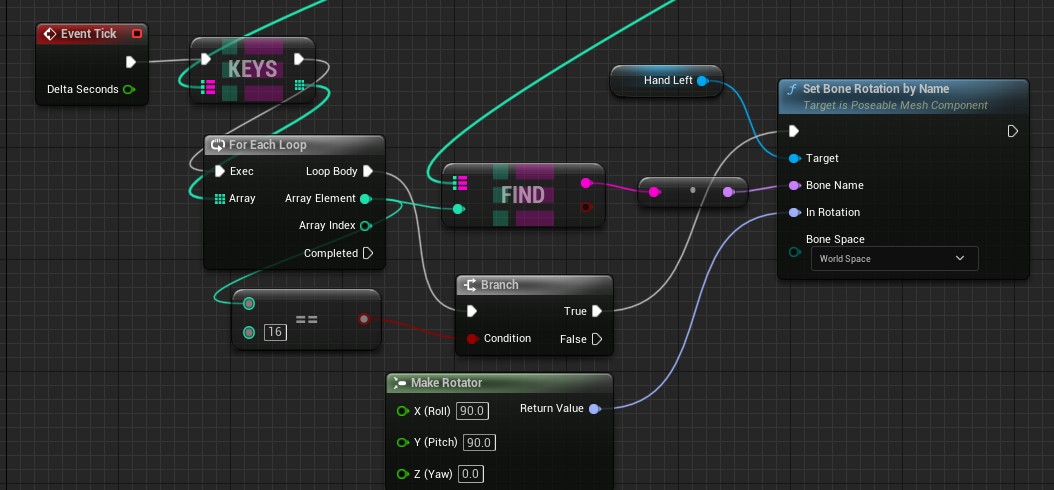
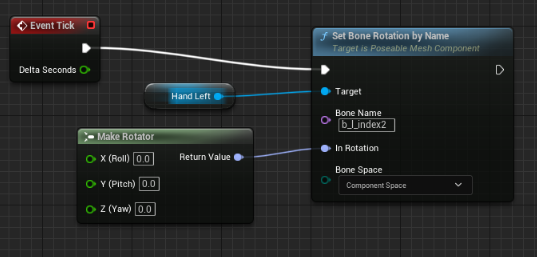
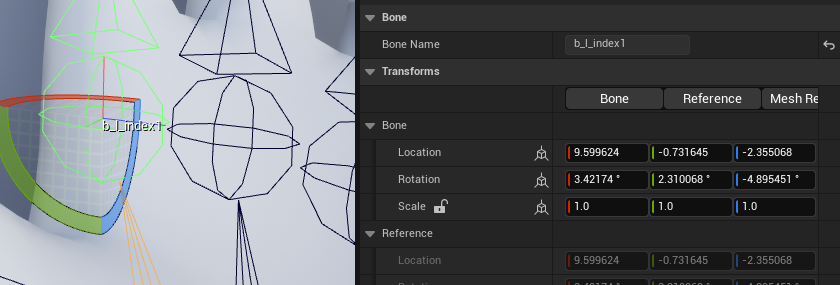
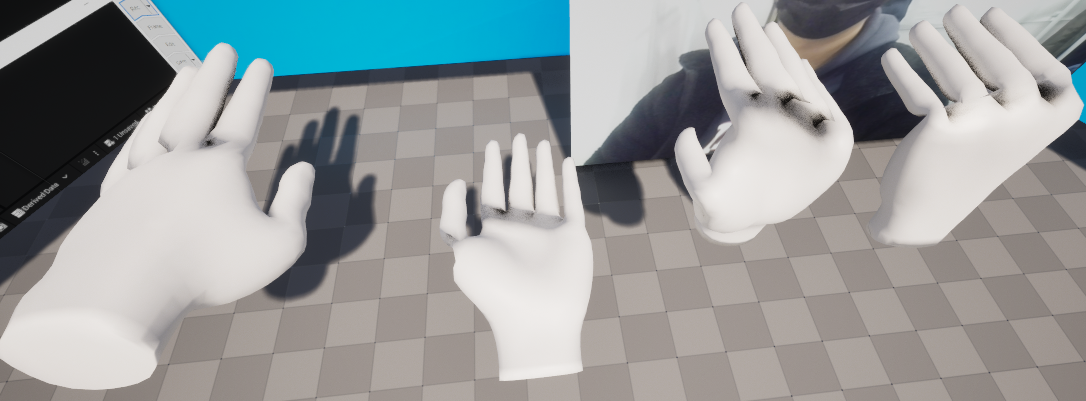
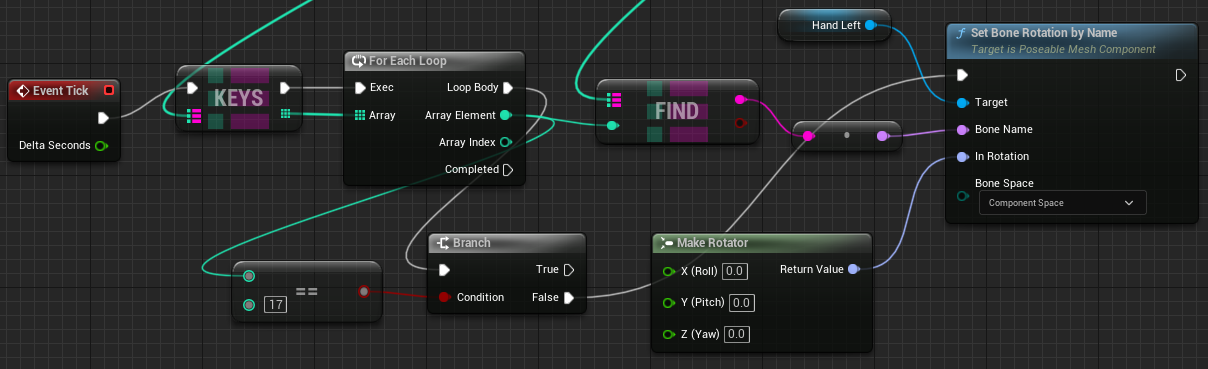
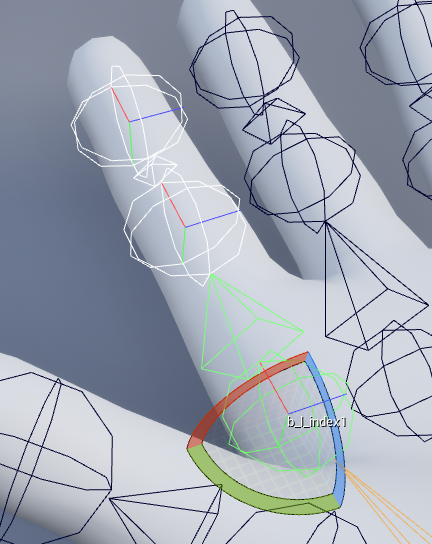
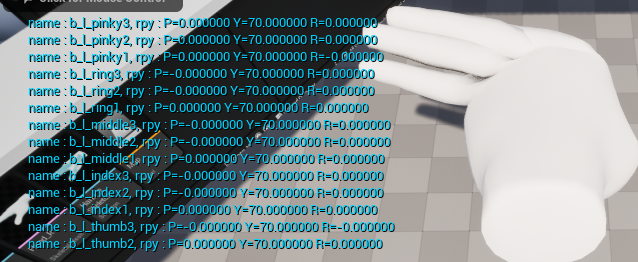
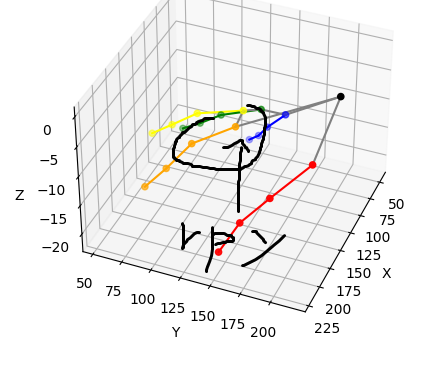
이제 이점들로 오큘러스 핸드의 관절 회전각을 구해야한다.
일단 반정규화 랜드마크 z축을 -1 곱해놓긴하자
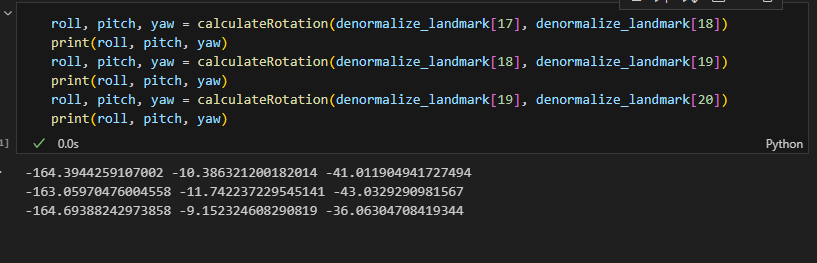
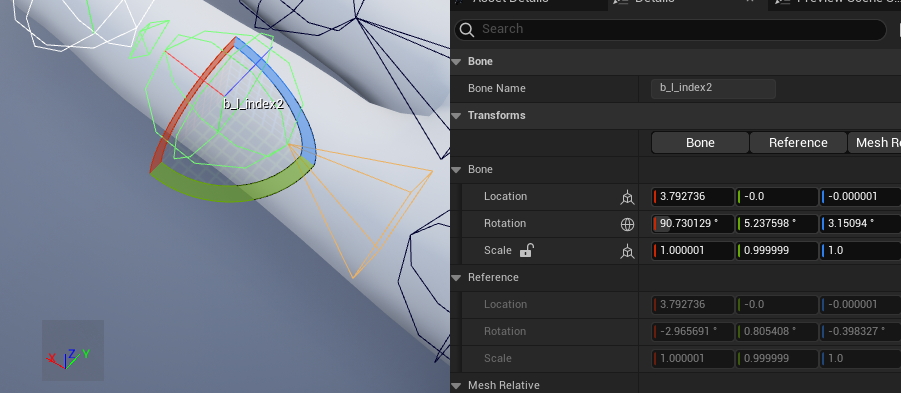
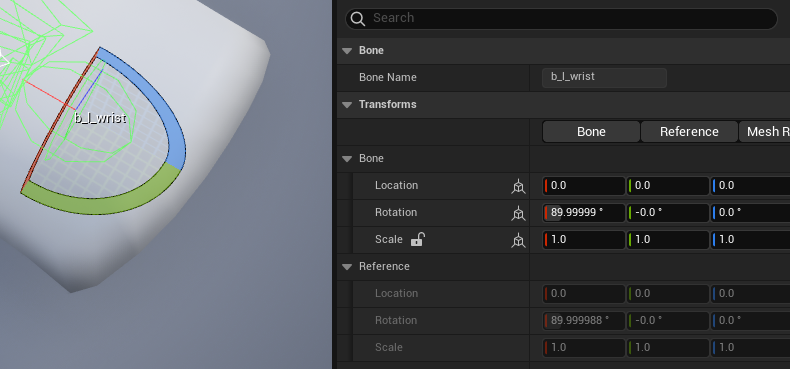
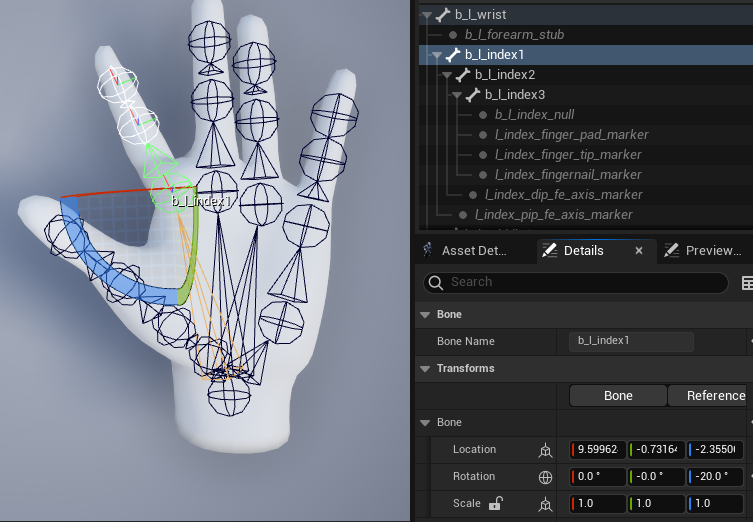
일단 검지 첫번째 관절부터 보자.
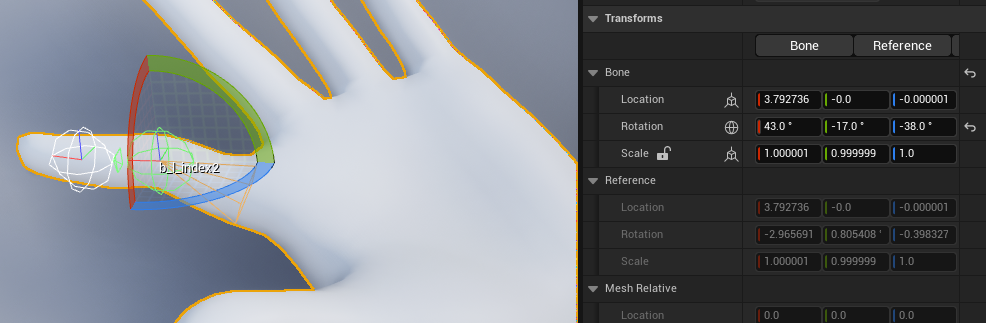
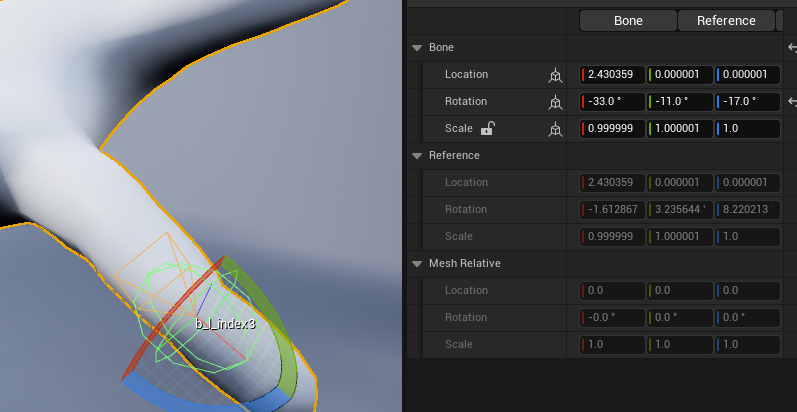
회전 상태를보면 롤피치요 다 거의 0,0,0
요 50도 정도 주면 이런식이된다.
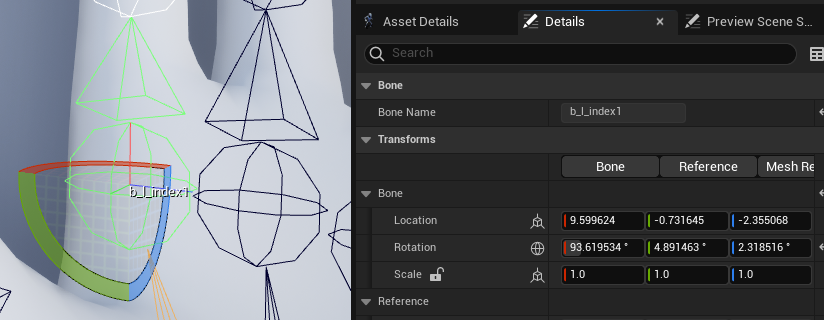
근데 위의건 로컬 좌표계 기준이라 전역이랑 좀 다르다.
랜드마크로 방향을 구하면 전역 좌표계 기준 방향이 나올듯한데
전역계기준 저 포인트의 rpy를 계산해내야할듯
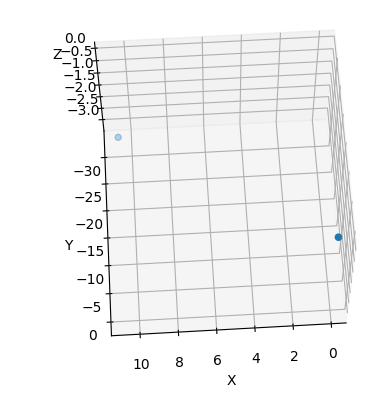
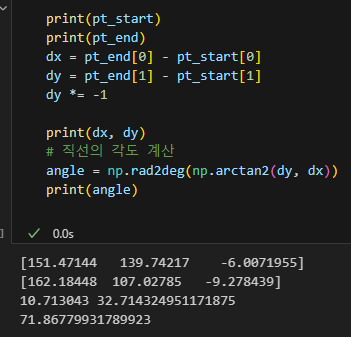
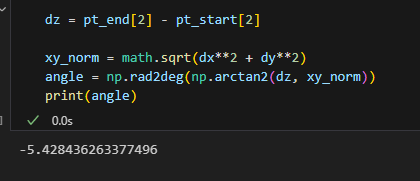
시작점과 끝점을 출력해보면 이런식인데
시작점으로 -시켜주면
시작점이 원점이 되고
끝점은 원점 기준으로 이동된다.
import matplotlib.pyplot as plt
import numpy as np
import pandas as pd
%matplotlib widget
pts = np.array([pt_start, pt_end])
# 3차원 산점도 그리기
fig = plt.figure()
ax = fig.add_subplot(111, projection='3d')
x = pts[:, 0]
y = pts[:, 1]
z = pts[:, 2]
ax.scatter(x, y, z)
ax.set_xlabel('X')
ax.set_ylabel('Y')
ax.set_zlabel('Z')
plt.show()
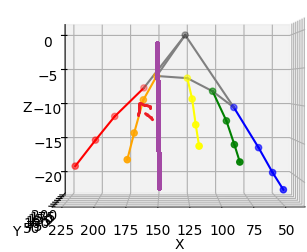
어캐할까 싶다가
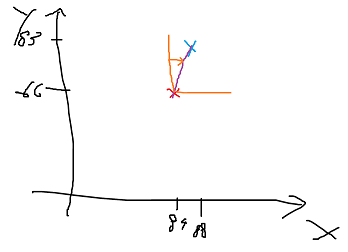
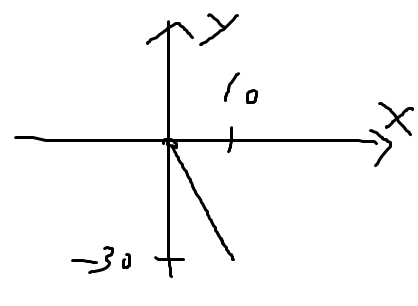
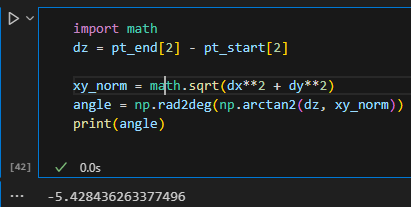
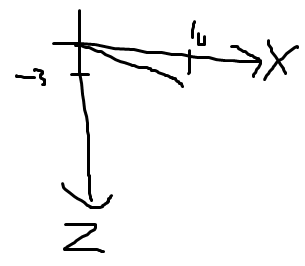
먼저 xy 평면에서 각도를 계산해보면
-71도 정도가나온다.
이번에는 xy 놈이랑 z좌표로 각을 구하면 -5도 정도가 나오는데 이것도 대충 맞겟지 싶다.
대충 각도구하긴 했는데, 언리얼에선 롤피치요를 쓰지만
여기선 각도 2개를 구했다.
z방향 회전 각도는 y축으로 회전한것이니 피치?
xy 평면 회전 각도는 z축으로 회전한것이니 요? 쯤 되지않나싶다.
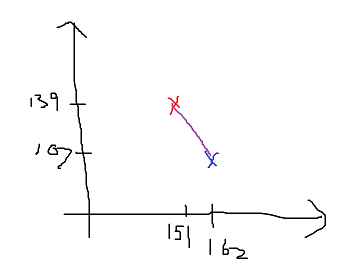
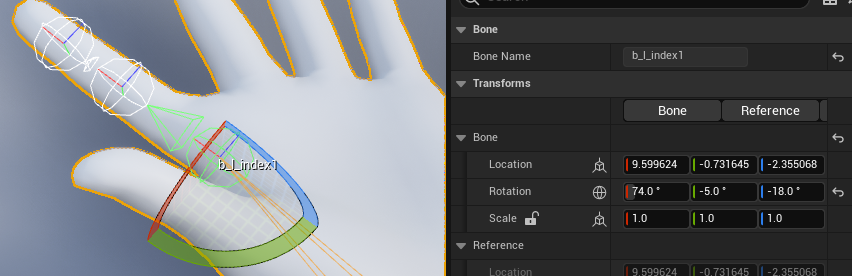
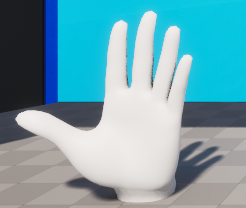
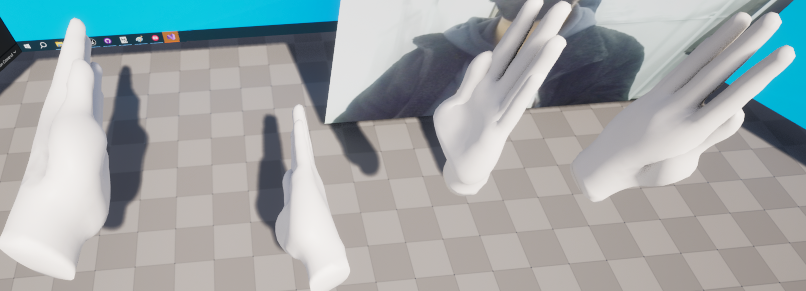
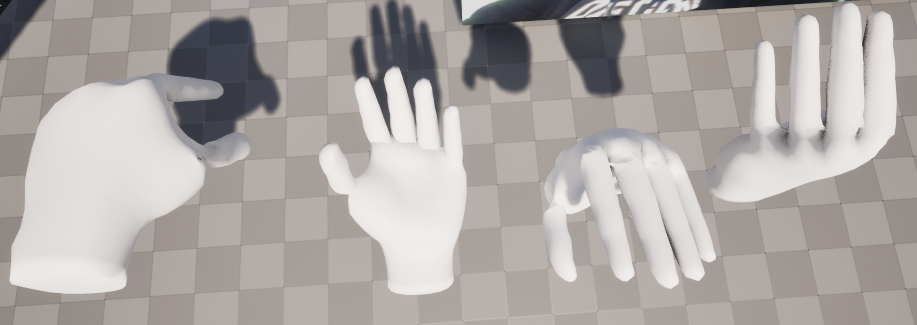
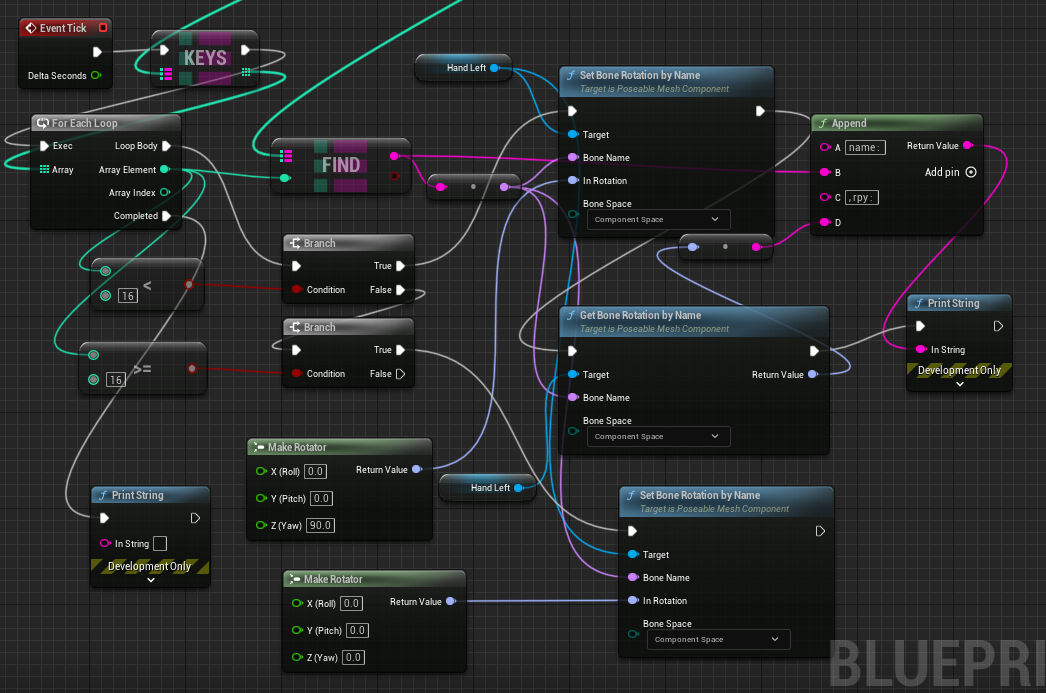
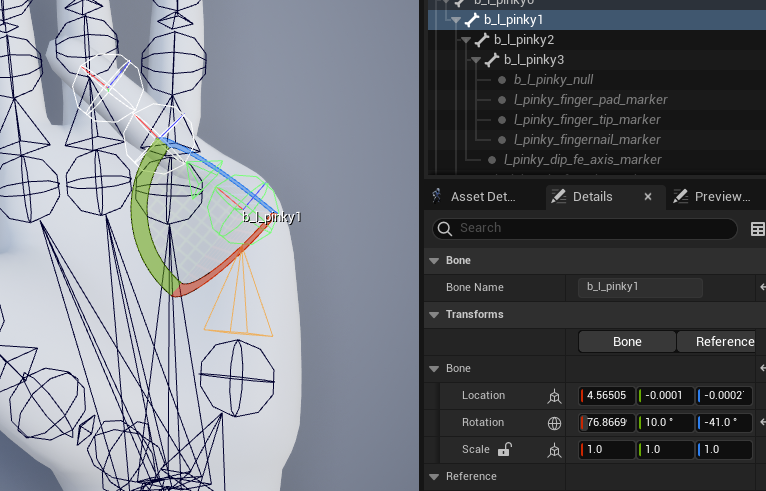
언리얼에서 관절을 돌려보긴하는데 뭔가 좀 이상하다.
위에서 보니 -70도라기보단 20도쯤 될거같은데
방향이 좀 달라서 그런듯싶다.
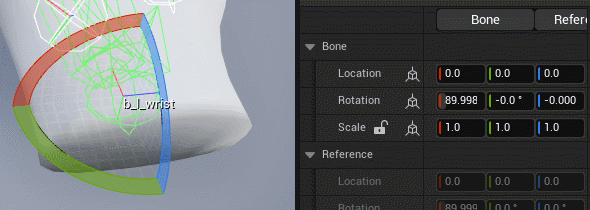
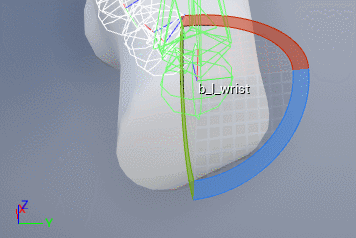
잠깐
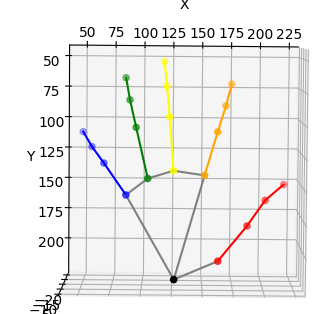
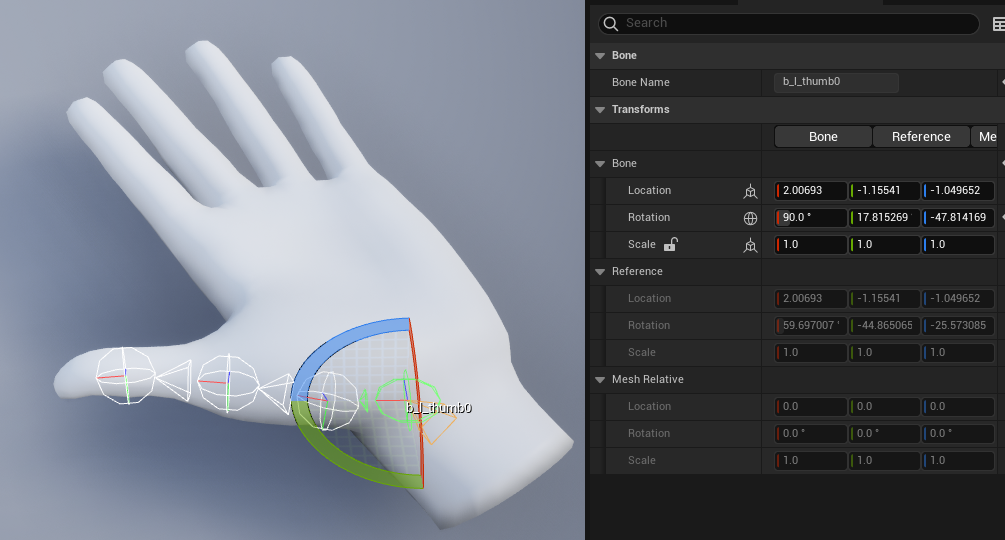
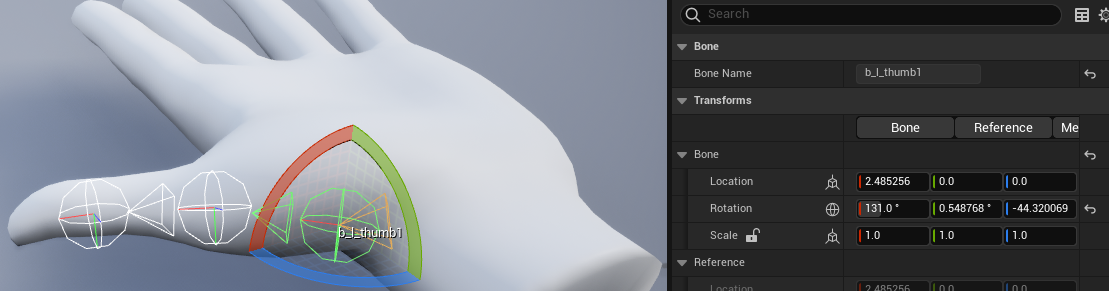
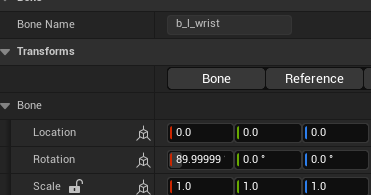
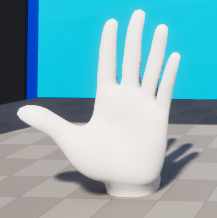
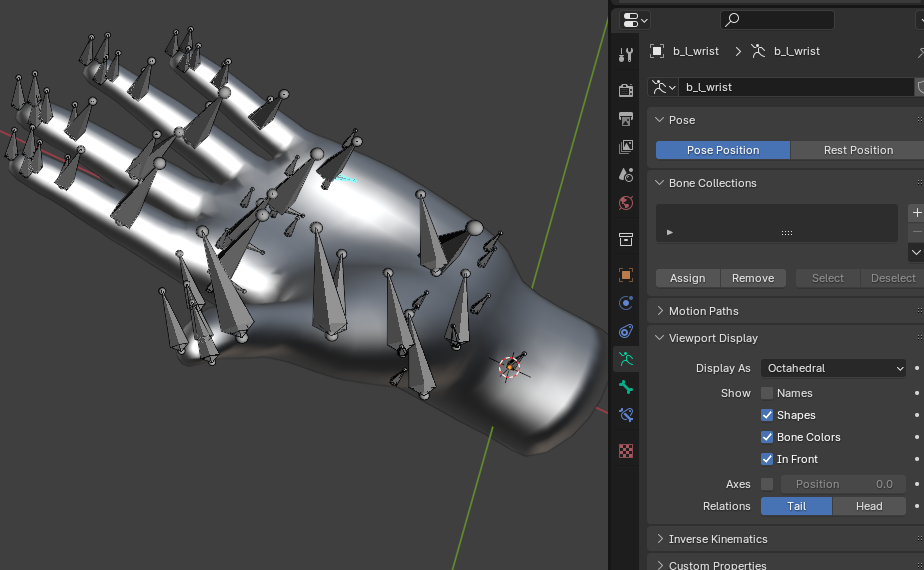
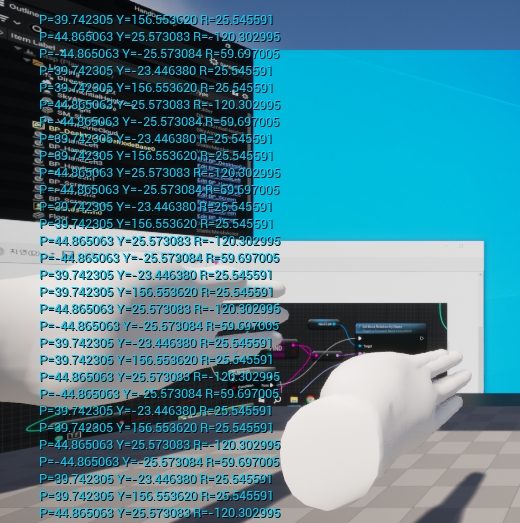
기본손의 다음 뼈들의 RPY를 다 0으로 설정했을때 모습
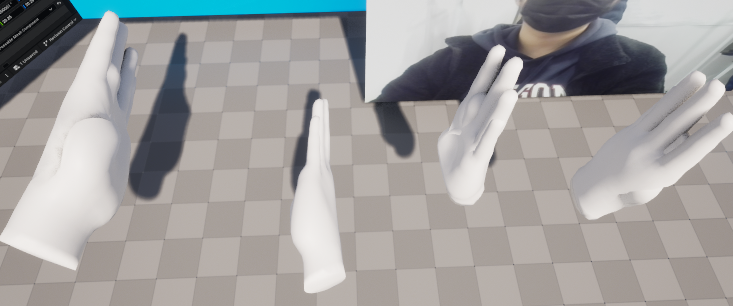
보는데 matplotlib에서 x축 방향이 반대로되어있으니 햇갈려서 다시띄움
import matplotlib.pyplot as plt
import numpy as np
import pandas as pd


%matplotlib widget

# 3차원 산점도 그리기
fig = plt.figure()
ax = fig.add_subplot(111, projection='3d')

x = denormalize_landmark[:, 0]
y = denormalize_landmark[:, 1]
z = denormalize_landmark[:, 2]

# 색상 지정
colors = ['black'] + ['red'] * 4 + ['orange'] * 4 + ['yellow'] * 4 + ['green'] * 4 + ['blue'] * 4
ax.scatter(x, y, z, c=colors)


#손가락
colors = ['red', 'orange', 'yellow', 'green', 'blue']
groups = [[1, 2, 3, 4], [5, 6, 7, 8], [9, 10, 11, 12], [13, 14, 15, 16], [17, 18, 19, 20]]
for i, group in enumerate(groups):
    for j in range(len(group)-1):
        plt.plot([x[group[j]], x[group[j+1]]], [y[group[j]], y[group[j+1]]], [z[group[j]], z[group[j+1]]], color=colors[i])
#손등
lines = [[0, 1], [0, 5], [0, 17], [5, 9], [9, 13], [13, 17]]
for line in lines:
    ax.plot([x[line[0]], x[line[1]]], [y[line[0]], y[line[1]]], [z[line[0]], z[line[1]]], color='gray')


ax.set_xlabel('X')
ax.set_ylabel('Y')
ax.set_zlabel('Z')


plt.gca().invert_xaxis()
plt.show()
// Fill out your copyright notice in the Description page of Project Settings.
#pragma once
#include "Components/PoseableMeshComponent.h"
#include "CoreMinimal.h"
#include "GameFramework/Actor.h"
#include "HandLeft.generated.h"
UCLASS()
class HANDDESKTOP_API AHandLeft : public AActor
{
GENERATED_BODY()
public:
// Sets default values for this actor's properties
AHandLeft();
protected:
// Called when the game starts or when spawned
virtual void BeginPlay() override;
public:
// Called every frame
virtual void Tick(float DeltaTime) override;
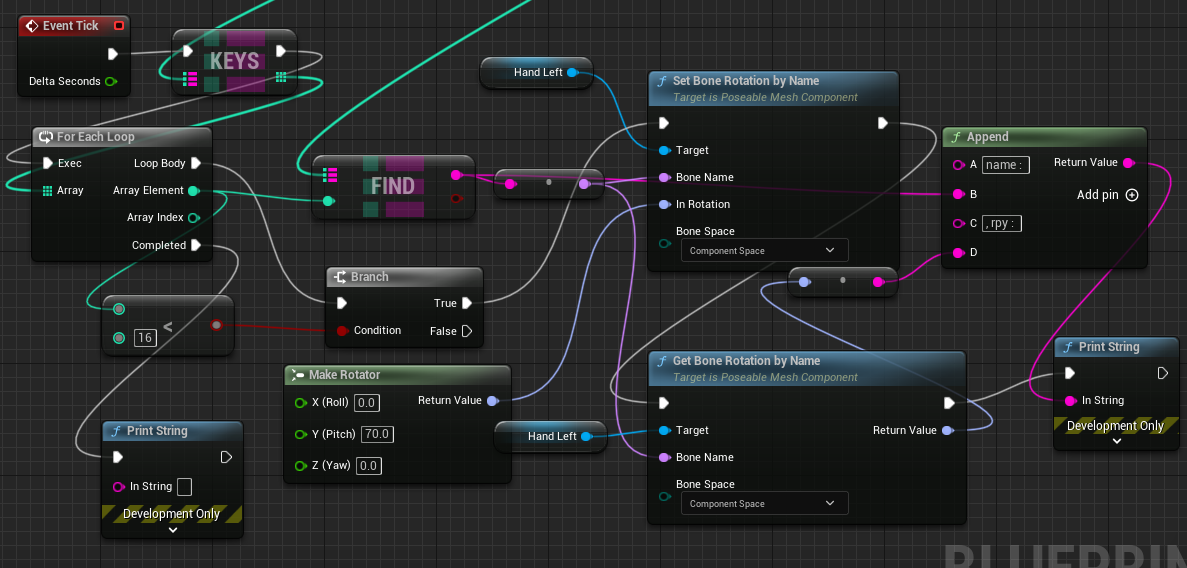
UPROPERTY(EditAnywhere, BlueprintReadWrite, Category=PoseableMesh)
UPoseableMeshComponent* HandLeft;
};
// Fill out your copyright notice in the Description page of Project Settings.
#include "HandLeft.h"
// Sets default values
AHandLeft::AHandLeft()
{
// Set this actor to call Tick() every frame. You can turn this off to improve performance if you don't need it.
PrimaryActorTick.bCanEverTick = true;
// 스켈레탈 메시 컴포넌트 생성 및 부착
ConstructorHelpers::FObjectFinder<USkeletalMesh> TempHandMesh(
TEXT("SkeletalMesh'/Game/MyContent/Hand_L.Hand_L'")
);
HandLeft = CreateDefaultSubobject<UPoseableMeshComponent>(TEXT("HandLeft"));
HandLeft->SetSkeletalMesh(TempHandMesh.Object);
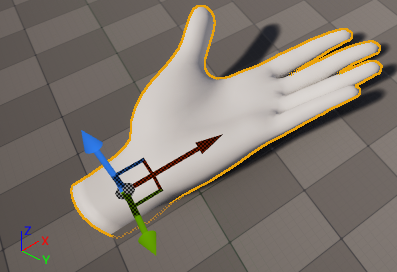
HandLeft->SetRelativeLocation(FVector(0, 0, 0));
//HandLeft->SetupAttachment(RootComponent);
}
// Called when the game starts or when spawned
void AHandLeft::BeginPlay()
{
Super::BeginPlay();
}
// Called every frame
void AHandLeft::Tick(float DeltaTime)
{
Super::Tick(DeltaTime);
}
MatToTexture2D가 기존에 imageTexture로 되있던걸 webcamTexture로 수정
* 웹캠 영상이 1280 x 720이라 FHD로 리사이징하여 처리
void ADesktopGameModeBase::MatToTexture2D(const cv::Mat InMat)
{
	if (InMat.type() == CV_8UC3)//example for pre-conversion of Mat
	{
		cv::Mat resizedImage;
		cv::resize(InMat, resizedImage, cv::Size(monitorWidth, monitorHeight));
		cv::Mat bgraImage;
		//if the Mat is in BGR space, convert it to BGRA. There is no three channel texture in UE (at least with eight bit)
		cv::cvtColor(resizedImage, bgraImage, cv::COLOR_BGR2BGRA);

		//Texture->SRGB = 0;//set to 0 if Mat is not in srgb (which is likely when coming from a webcam)
		//other settings of the texture can also be changed here
		//Texture->UpdateResource();

		//actually copy the data to the new texture
		FTexture2DMipMap& Mip = webcamTexture->GetPlatformData()->Mips[0];
		void* Data = Mip.BulkData.Lock(LOCK_READ_WRITE);//lock the texture data
		FMemory::Memcpy(Data, bgraImage.data, bgraImage.total() * bgraImage.elemSize());//copy the data
		Mip.BulkData.Unlock();
		webcamTexture->PostEditChange();
		webcamTexture->UpdateResource();
	}
	else if (InMat.type() == CV_8UC4)
	{
		//actually copy the data to the new texture
		FTexture2DMipMap& Mip = webcamTexture->GetPlatformData()->Mips[0];
		void* Data = Mip.BulkData.Lock(LOCK_READ_WRITE);//lock the texture data
		FMemory::Memcpy(Data, InMat.data, InMat.total() * InMat.elemSize());//copy the data
		Mip.BulkData.Unlock();
		webcamTexture->PostEditChange();
		webcamTexture->UpdateResource();
	}
	//if the texture hasnt the right pixel format, abort.
	webcamTexture->PostEditChange();
	webcamTexture->UpdateResource();
}

}
// Fill out your copyright notice in the Description page of Project Settings.


#include "Blaze.h"

Blaze::Blaze()
{
	this->blazePalm = cv::dnn::readNet("c:/blazepalm_old.onnx");
	this->blazeHand = cv::dnn::readNet("c:/blazehand.onnx");
}

Blaze::~Blaze()
{
}
이제 리사이징, 패딩 파이썬 코드를 cpp로 작성
def resize_pad(img):
    """ resize and pad images to be input to the detectors

    The face and palm detector networks take 256x256 and 128x128 images
    as input. As such the input image is padded and resized to fit the
    size while maintaing the aspect ratio.

    Returns:
        img1: 256x256
        img2: 128x128
        scale: scale factor between original image and 256x256 image
        pad: pixels of padding in the original image
    """

    size0 = img.shape
    if size0[0]>=size0[1]:
        h1 = 256
        w1 = 256 * size0[1] // size0[0]
        padh = 0
        padw = 256 - w1
        scale = size0[1] / w1
    else:
        h1 = 256 * size0[0] // size0[1]
        w1 = 256
        padh = 256 - h1
        padw = 0
        scale = size0[0] / h1
    padh1 = padh//2
    padh2 = padh//2 + padh%2
    padw1 = padw//2
    padw2 = padw//2 + padw%2
    img1 = cv2.resize(img, (w1,h1))
    img1 = np.pad(img1, ((padh1, padh2), (padw1, padw2), (0,0)))
    pad = (int(padh1 * scale), int(padw1 * scale))
    img2 = cv2.resize(img1, (128,128))

    // img256을 srcimg의 (0, 0) 좌표에 그리기
    cv::Mat roi1 = srcimg(cv::Rect(0, 0, img256.cols, img256.rows));
    img256.copyTo(roi1);

    // img128를 srcimg의 (300, 0) 좌표에 그리기
    cv::Mat roi2 = srcimg(cv::Rect(300, 0, img128.cols, img128.rows));
    img128.copyTo(roi2);
    return img1, img2, scale, pad
    img1, img2, scale, pad = resize_pad(frame)

    if back_detector:
        normalized_face_detections = face_detector.predict_on_image(img1)
    else:
        normalized_face_detections = face_detector.predict_on_image(img2)
    normalized_palm_detections = palm_detector.predict_on_image(img1)
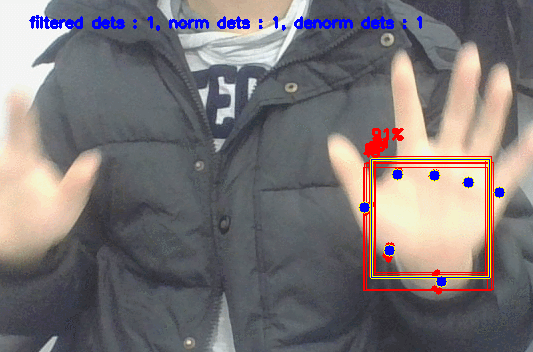
일단 블라즈팜 디텍터 코드를 들어가서보면
전처리 -> 추론 -> 텐서투 디텍션 -> NMS 필터링 순으로 동작된다.
먼저 전처리 코드부터 보자
    def predict_on_batch(self, x):
        """Makes a prediction on a batch of images.

        Arguments:
            x: a NumPy array of shape (b, H, W, 3) or a PyTorch tensor of
               shape (b, 3, H, W). The height and width should be 128 pixels.

        Returns:
            A list containing a tensor of face detections for each image in
            the batch. If no faces are found for an image, returns a tensor
            of shape (0, 17).

        Each face detection is a PyTorch tensor consisting of 17 numbers:
            - ymin, xmin, ymax, xmax
            - x,y-coordinates for the 6 keypoints
            - confidence score
        """
        if isinstance(x, np.ndarray):
            x = torch.from_numpy(x).permute((0, 3, 1, 2))

        assert x.shape[1] == 3
        assert x.shape[2] == self.y_scale
        assert x.shape[3] == self.x_scale

        # 1. Preprocess the images into tensors:
        x = x.to(self._device())
        x = self._preprocess(x)

        # 2. Run the neural network:
        with torch.no_grad():
            out = self.__call__(x)

        # 3. Postprocess the raw predictions:
        detections = self._tensors_to_detections(out[0], out[1], self.anchors)

        # 4. Non-maximum suppression to remove overlapping detections:
        filtered_detections = []
        for i in range(len(detections)):
            faces = self._weighted_non_max_suppression(detections[i])
            faces = torch.stack(faces) if len(faces) > 0 else torch.zeros((0, self.num_coords+1))
            filtered_detections.append(faces)

        return filtered_detections
전처리 코드는 /255 뿐인데 옆에 주석으로 # 127.5 - 1.0으로 되어있다.
cvdnn으로 팜디텍터 전처리할때는 /127.5 - 1했었는데 여긴 왜 /255한진 모르겠다.
    def _preprocess(self, x):
        """Converts the image pixels to the range [-1, 1]."""
        return x.float() / 255.# 127.5 - 1.0
def _tensors_to_detections(self, raw_box_tensor, raw_score_tensor, anchors):
"""The output of the neural network is a tensor of shape (b, 896, 16)
containing the bounding box regressor predictions, as well as a tensor
of shape (b, 896, 1) with the classification confidences.
This function converts these two "raw" tensors into proper detections.
Returns a list of (num_detections, 17) tensors, one for each image in
the batch.
This is based on the source code from:
mediapipe/calculators/tflite/tflite_tensors_to_detections_calculator.cc
mediapipe/calculators/tflite/tflite_tensors_to_detections_calculator.proto
"""
assert raw_box_tensor.ndimension() == 3
assert raw_box_tensor.shape[1] == self.num_anchors
assert raw_box_tensor.shape[2] == self.num_coords
assert raw_score_tensor.ndimension() == 3
assert raw_score_tensor.shape[1] == self.num_anchors
assert raw_score_tensor.shape[2] == self.num_classes
assert raw_box_tensor.shape[0] == raw_score_tensor.shape[0]
detection_boxes = self._decode_boxes(raw_box_tensor, anchors)
thresh = self.score_clipping_thresh
raw_score_tensor = raw_score_tensor.clamp(-thresh, thresh)
detection_scores = raw_score_tensor.sigmoid().squeeze(dim=-1)
# Note: we stripped off the last dimension from the scores tensor
# because there is only has one class. Now we can simply use a mask
# to filter out the boxes with too low confidence.
mask = detection_scores >= self.min_score_thresh
# Because each image from the batch can have a different number of
# detections, process them one at a time using a loop.
output_detections = []
for i in range(raw_box_tensor.shape[0]):
boxes = detection_boxes[i, mask[i]]
scores = detection_scores[i, mask[i]].unsqueeze(dim=-1)
output_detections.append(torch.cat((boxes, scores), dim=-1))
return output_detections
def _decode_boxes(self, raw_boxes, anchors):
"""Converts the predictions into actual coordinates using
the anchor boxes. Processes the entire batch at once.
"""
boxes = torch.zeros_like(raw_boxes)
x_center = raw_boxes[..., 0] / self.x_scale * anchors[:, 2] + anchors[:, 0]
y_center = raw_boxes[..., 1] / self.y_scale * anchors[:, 3] + anchors[:, 1]
w = raw_boxes[..., 2] / self.w_scale * anchors[:, 2]
h = raw_boxes[..., 3] / self.h_scale * anchors[:, 3]
boxes[..., 0] = y_center - h / 2. # ymin
boxes[..., 1] = x_center - w / 2. # xmin
boxes[..., 2] = y_center + h / 2. # ymax
boxes[..., 3] = x_center + w / 2. # xmax
for k in range(self.num_keypoints):
offset = 4 + k*2
keypoint_x = raw_boxes[..., offset ] / self.x_scale * anchors[:, 2] + anchors[:, 0]
keypoint_y = raw_boxes[..., offset + 1] / self.y_scale * anchors[:, 3] + anchors[:, 1]
boxes[..., offset ] = keypoint_x
boxes[..., offset + 1] = keypoint_y
return boxes
이전에 스코어랑, 박스 좌표를 가져오는 후처리 코드 만들어둔게 있긴한데
여기서는 키포인트까지 담지는 않고, (스코어,x,y,w,h) 순으로 만들었엇다.
파이썬 코드는 (ymin,xmin,ymax,xmax,kp1x,kp1y, ...., kp6x, pk6y, score)로 17개인 형태
struct DetectResult {
float score;
int x;
int y;
int w;
int h;
};
std::vector<ASimulatorGameModeBase::DetectResult> ASimulatorGameModeBase::getDetectResults(cv::Mat frame, cv::dnn::Net net, cv::Size detectInputSize, cv::Size detectOutputSize)
{
std::vector<DetectResult> beforeNMSResults;
std::vector<DetectResult> afterNMSResults;
std::vector<float> scores;
std::vector<int> indices;
std::vector<cv::Rect> boundingBoxes;
cv::Mat inputImg;
cv::resize(frame, inputImg, detectInputSize);
cv::cvtColor(inputImg, inputImg, cv::COLOR_BGR2RGB);
    cv::Mat tensor;
    inputImg.convertTo(tensor, CV_32F, 1 / 127.5, -1.0);
    cv::Mat blob = cv::dnn::blobFromImage(tensor, 1.0, tensor.size(), 0, false, false, CV_32F);
    std::vector<cv::String> outNames(2);
    outNames[0] = "regressors";
    outNames[1] = "classificators";

    net.setInput(blob);
    std::vector<cv::Mat> outputs;
    net.forward(outputs, outNames);

    cv::Mat classificator = outputs[0];
    cv::Mat regressor = outputs[1];
for (int y = 0; y < 16; ++y) {
for (int x = 0; x < 16; ++x) {
for (int a = 0; a < 2; ++a) {
DetectResult res = getDetectResult(frame, regressor, classificator, 8, 2, x, y, a, 0, detectInputSize, detectOutputSize);
if (res.score != 0)
{
beforeNMSResults.push_back(res);
boundingBoxes.push_back(cv::Rect(res.x, res.y, res.w, res.h));
scores.push_back(res.score);
}
}
}
}
for (int y = 0; y < 8; ++y) {
for (int x = 0; x < 8; ++x) {
for (int a = 0; a < 6; ++a) {
DetectResult res = getDetectResult(frame, regressor, classificator, 16, 6, x, y, a, 512, detectInputSize, detectOutputSize);
if (res.score != 0)
{
beforeNMSResults.push_back(res);
boundingBoxes.push_back(cv::Rect(res.x, res.y, res.w, res.h));
scores.push_back(res.score);
}
}
}
}
cv::dnn::NMSBoxes(boundingBoxes, scores, 0.5, 0.3, indices);
for (int i = 0; i < indices.size(); i++) {
int idx = indices[i];
afterNMSResults.push_back(beforeNMSResults[idx]);
}
return afterNMSResults;
}
일단 blaze.h로 돌아와 팜 디텍션에 필요한 변수 함수 구조체 선언
팜 디텍션에 키포인트 좌표도 필요하긴 한데 일단 동작되는지만 보기위해 기존 코드 비슷하게 감
/**
 *
 */
class HANDDESKTOP_API Blaze
{
public:
	Blaze();
	~Blaze();

	cv::dnn::Net blazePalm;
	cv::dnn::Net blazeHand;


	//for resize and pad
	static void ResizeAndPad(
		cv::Mat& srcimg, cv::Mat& img256,
		cv::Mat& img128, float& scale, cv::Scalar& pad
	);


	// var and funcs for blazepalm
	struct PalmDetection {
		int x;
		int y;
		int w;
		int h;
		float score;
	};


	float palmMinScoreThresh = 0.5;
	float palmMinNMSThresh = 0.3;
	int palmMinNumKeyPoints = 6;

	std::vector<PalmDetection> PredictPalmDetections(cv::Mat& img);
	PalmDetection GetPalmDetection(cv::Mat regressor, cv::Mat classificator,
		int stride, int anchor_count, int column, int row, int anchor, int offset);
	float sigmoid(float x);

};
기존 추론, 후처리 코드에는 반정규화도 포함되어있긴했지만
파이썬 코드 비슷하게 만들려고 따로 뺏음
일단 정규화된 팜 디텍션 검출 결과들 반환하는 코드 준비됬고
std::vector<Blaze::PalmDetection> Blaze::PredictPalmDetections(cv::Mat& img)
{
    std::vector<Blaze::PalmDetection> beforeNMSResults;
    std::vector<Blaze::PalmDetection> afterNMSResults;
    std::vector<float> scores;
    std::vector<int> indices;
    std::vector<cv::Rect> boundingBoxes;


    cv::Mat inputImg;
    cv::cvtColor(img, inputImg, cv::COLOR_BGR2RGB);

    cv::Mat tensor;
    inputImg.convertTo(tensor, CV_32F, 1 / 127.5, -1.0);
    cv::Mat blob = cv::dnn::blobFromImage(tensor, 1.0, tensor.size(), 0, false, false, CV_32F);
    std::vector<cv::String> outNames(2);
    outNames[0] = "regressors";
    outNames[1] = "classificators";

    blazePalm.setInput(blob);
    std::vector<cv::Mat> outputs;
    blazePalm.forward(outputs, outNames);

    cv::Mat classificator = outputs[0];
    cv::Mat regressor = outputs[1];


    for (int y = 0; y < 16; ++y) {
        for (int x = 0; x < 16; ++x) {
            for (int a = 0; a < 2; ++a) {
                PalmDetection res = GetPalmDetection(regressor, classificator, 8, 2, x, y, a, 0, detectInputSize, detectOutputSize);
                if (res.score != 0)
                {
                    beforeNMSResults.push_back(res);
                    boundingBoxes.push_back(cv::Rect(res.x, res.y, res.w, res.h));
                    scores.push_back(res.score);
                }
            }
        }
    }

    for (int y = 0; y < 8; ++y) {
        for (int x = 0; x < 8; ++x) {
            for (int a = 0; a < 6; ++a) {
                PalmDetection res = GetPalmDetection(regressor, classificator, 16, 6, x, y, a, 512, detectInputSize, detectOutputSize);
                if (res.score != 0)
                {
                    beforeNMSResults.push_back(res);
                    boundingBoxes.push_back(cv::Rect(res.x, res.y, res.w, res.h));
                    scores.push_back(res.score);
                }
            }
        }
    }


    cv::dnn::NMSBoxes(boundingBoxes, scores, palmMinScoreThresh, palmMinNMSThresh, indices);

    for (int i = 0; i < indices.size(); i++) {
        int idx = indices[i];
        afterNMSResults.push_back(beforeNMSResults[idx]);
    }

    return afterNMSResults;
}

Blaze::PalmDetection Blaze::GetPalmDetection(cv::Mat regressor, cv::Mat classificator,
    int stride, int anchor_count, int column, int row, int anchor, int offset) {

    Blaze::PalmDetection res{0, 0, 0, 0, 0.0f};

    int index = (int(row * 128 / stride) + column) * anchor_count + anchor + offset;
    float origin_score = regressor.at<float>(0, index, 0);
    float score = sigmoid(origin_score);
    if (score < palmMinScoreThresh) return res;

    float x = classificator.at<float>(0, index, 0);
    float y = classificator.at<float>(0, index, 1);
    float w = classificator.at<float>(0, index, 2);
    float h = classificator.at<float>(0, index, 3);


    x += (column + 0.5) * stride - w / 2;
    y += (row + 0.5) * stride - h / 2;

    res.score = score;
    res.x = int(x);
    res.y = int(y);
    res.w = int(w);
    res.h = int(h);
    return res;
}

float Blaze::sigmoid(float x) {
    return 1 / (1 + exp(-x));
}
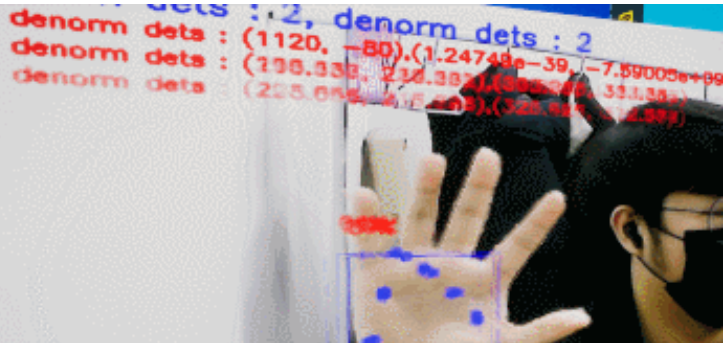
반정규화 과정은
패딩 처리된 256 x 256 이미지 기준 정규화된 좌표들을
패딩 처리되어 1280 x 1280 형태로 돌린 후 패딩을 제거해
1280 x 720이미지에 맞게 위치를 조정하는 내용
def denormalize_detections(detections, scale, pad):
    """ maps detection coordinates from [0,1] to image coordinates

    The face and palm detector networks take 256x256 and 128x128 images
    as input. As such the input image is padded and resized to fit the
    size while maintaing the aspect ratio. This function maps the
    normalized coordinates back to the original image coordinates.

    Inputs:
        detections: nxm tensor. n is the number of detections.
            m is 4+2*k where the first 4 valuse are the bounding
            box coordinates and k is the number of additional
            keypoints output by the detector.
        scale: scalar that was used to resize the image
        pad: padding in the x and y dimensions

    """
    detections[:, 0] = detections[:, 0] * scale * 256 - pad[0]
    detections[:, 1] = detections[:, 1] * scale * 256 - pad[1]
    detections[:, 2] = detections[:, 2] * scale * 256 - pad[0]
    detections[:, 3] = detections[:, 3] * scale * 256 - pad[1]

    detections[:, 4::2] = detections[:, 4::2] * scale * 256 - pad[1]
    detections[:, 5::2] = detections[:, 5::2] * scale * 256 - pad[0]
    return detections
일단 내가 가지고 있는 팜디텍션 모델은 구버전이라 256 x 256이 아닌 128 x 128 사용하므로 조금 다름
코드 작성하다보니 xmin, ymin, xmax, ymax로 다루고 있었는데 내코드에는 xywh를 쓰고 있었네
잠깐 기존 PalmDetection 내용을 (ymin,xmin,ymax,xmax, score) 형태로 수정
블라즈 헤더
	struct PalmDetection {
		int ymin;
		int xmin;
		int ymax;
		int xmax;
		float score;
	};
블라드 cpp
Blaze::PalmDetection Blaze::GetPalmDetection(cv::Mat regressor, cv::Mat classificator,
    int stride, int anchor_count, int column, int row, int anchor, int offset) {

    Blaze::PalmDetection res{0, 0, 0, 0, 0.0f};

    int index = (int(row * 128 / stride) + column) * anchor_count + anchor + offset;
    float origin_score = regressor.at<float>(0, index, 0);
    float score = sigmoid(origin_score);
    if (score < palmMinScoreThresh) return res;

    float x = classificator.at<float>(0, index, 0);
    float y = classificator.at<float>(0, index, 1);
    float w = classificator.at<float>(0, index, 2);
    float h = classificator.at<float>(0, index, 3);


    x += (column + 0.5) * stride - w / 2;
    y += (row + 0.5) * stride - h / 2;

    res.ymin = int(y);
    res.xmin = int(x);
    res.ymax = int(y + h);
    res.xmax = int(x + w);
    res.score = score;
    return res;
}
블라즈팜 구버전은 128 사이즈 사용하므로
검출결과들 반정규화 코드는 이런식으로 작성
	// var and funcs for blazepalm
	struct PalmDetection {
		int ymin;
		int xmin;
		int ymax;
		int xmax;
		float score;
	};

	int blazePalmSize = 128;
	float palmMinScoreThresh = 0.5;
	float palmMinNMSThresh = 0.3;
	int palmMinNumKeyPoints = 6;

	std::vector<PalmDetection> PredictPalmDetections(cv::Mat& img);
	PalmDetection GetPalmDetection(cv::Mat regressor, cv::Mat classificator,
		int stride, int anchor_count, int column, int row, int anchor, int offset);
	float sigmoid(float x);
	std::vector<PalmDetection> DenormalizePalmDetections(std::vector<PalmDetection> detections, float scale, cv::Scalar pad);
};
	// var and funcs for blazepalm
	struct PalmDetection {
		int ymin;
		int xmin;
		int ymax;
		int xmax;
		float score;
	};

	int blazePalmSize = 128;
	float palmMinScoreThresh = 0.5;
	float palmMinNMSThresh = 0.3;
	int palmMinNumKeyPoints = 6;

	std::vector<PalmDetection> PredictPalmDetections(cv::Mat& img);
	PalmDetection GetPalmDetection(cv::Mat regressor, cv::Mat classificator,
		int stride, int anchor_count, int column, int row, int anchor, int offset);
	float sigmoid(float x);
	std::vector<PalmDetection> DenormalizePalmDetections(std::vector<PalmDetection> detections, float scale, cv::Scalar pad);
	void DrawPalmDetections(cv::Mat& img, std::vector<Blaze::PalmDetection> denormDets);

};
Blaze::PalmDetection Blaze::GetPalmDetection(cv::Mat regressor, cv::Mat classificator,
    int stride, int anchor_count, int column, int row, int anchor, int offset) {

    Blaze::PalmDetection res{0, 0, 0, 0, 0.0f};

    int index = (int(row * 128 / stride) + column) * anchor_count + anchor + offset;
    float origin_score = regressor.at<float>(0, index, 0);
    float score = sigmoid(origin_score);
    if (score < palmMinScoreThresh) return res;

    float x = classificator.at<float>(0, index, 0);
    float y = classificator.at<float>(0, index, 1);
    float w = classificator.at<float>(0, index, 2);
    float h = classificator.at<float>(0, index, 3);


    x += (column + 0.5) * stride - w / 2;
    y += (row + 0.5) * stride - h / 2;

    res.ymin = (y) / blazePalmSize;
    res.xmin = (x) / blazePalmSize;
    res.ymax = (y + h) / blazePalmSize;
    res.xmax = (x + w) / blazePalmSize;
    res.score = score;
    return res;
}
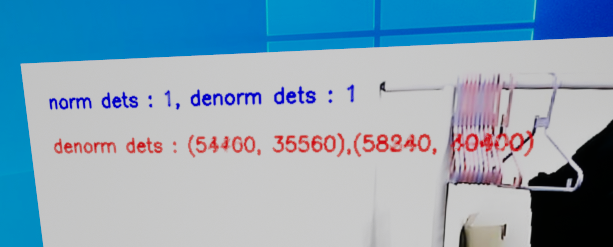
반정규화 코드에서는 width, height 받아서 긴쪽으로 스케일링하여 1280 x 1280 크기 좌표들 만든뒤
패딩 만큼 -하여 조정
블라즈 해더 cpp
	std::vector<PalmDetection> PredictPalmDetections(cv::Mat& img);
	PalmDetection GetPalmDetection(cv::Mat regressor, cv::Mat classificator,
		int stride, int anchor_count, int column, int row, int anchor, int offset);
	float sigmoid(float x);
	std::vector<PalmDetection> DenormalizePalmDetections(std::vector<PalmDetection> detections, int width, int height, cv::Scalar pad);
	void DrawPalmDetections(cv::Mat& img, std::vector<Blaze::PalmDetection> denormDets);